用户中心认证开发以及 Zuul 网关

用户认证
认证流程分析
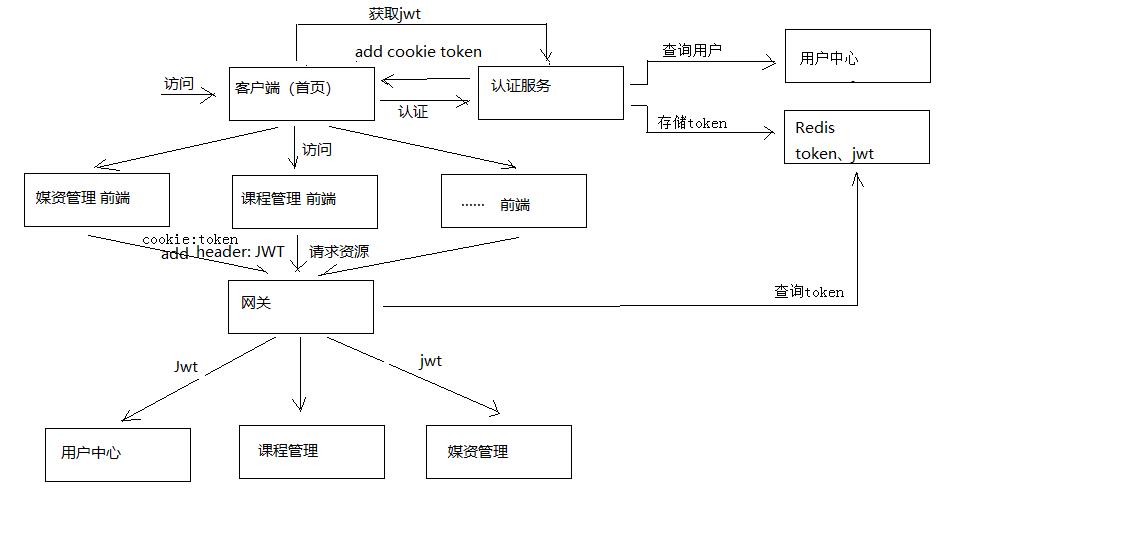
- 客户端请求认证服务进行认证。
- 认证服务认证通过向浏览器
cookie写入token(身份令牌)
- 认证服务请求用户中心查询用户信息。
- 认证服务请求
Spring Security申请令牌。
- 认证服务将
token(身份令牌)和jwt令牌存储至redis中。
- 认证服务向
cookie写入 token(身份令牌)。
- 前端携带
token请求认证服务获取jwt令牌
- 前端获取到
jwt令牌并存储在sessionStorage。
- 前端从
jwt令牌中解析中用户信息并显示在页面。
- 前端携带
cookie中的token身份令牌及jwt令牌访问资源服务
- 前端请求资源服务需要携带两个
token,一个是cookie中的身份令牌,一个是http header中的jwt令牌
- 前端请求资源服务前在
http header上添加jwt请求资源
- 网关校验token的合法性
认证流程查询数据库
项目导入、搭建(省略)
新增API
1
2
3
4
5
6
7
8
9
10
11
12
13
| package com.xuecheng.api.ucenter;
import com.xuecheng.framework.domain.ucenter.ext.XcUserExt;
import io.swagger.annotations.Api;
import io.swagger.annotations.ApiOperation;
@Api(value = "用户中心", description = "用户中心管理")
public interface UcenterControllerApi {
@ApiOperation("按用户名查询用户信息")
XcUserExt findByUsername(String username);
}
|
UcenterController
1
2
3
4
5
6
7
8
9
10
11
12
13
14
15
16
17
18
19
20
21
22
23
24
25
| package com.xuecheng.ucenter.controller;
import com.xuecheng.api.ucenter.UcenterControllerApi;
import com.xuecheng.framework.domain.ucenter.ext.XcUserExt;
import com.xuecheng.ucenter.service.UserService;
import org.springframework.beans.factory.annotation.Autowired;
import org.springframework.web.bind.annotation.GetMapping;
import org.springframework.web.bind.annotation.RequestMapping;
import org.springframework.web.bind.annotation.RequestParam;
import org.springframework.web.bind.annotation.RestController;
@RestController
@RequestMapping("ucenter")
public class UserController implements UcenterControllerApi {
@Autowired
private UserService userService;
@Override
@GetMapping("getuserext")
public XcUserExt findByUsername(@RequestParam("username") String username) {
return userService.findByUsername(username);
}
}
|
UcenterService
1
2
3
4
5
6
7
8
9
10
11
12
13
14
15
16
17
18
19
20
21
22
23
24
25
26
27
28
29
30
31
32
33
34
35
36
37
38
39
40
41
42
43
44
45
46
47
| package com.xuecheng.ucenter.service;
import com.xuecheng.framework.domain.ucenter.XcCompanyUser;
import com.xuecheng.framework.domain.ucenter.XcUser;
import com.xuecheng.framework.domain.ucenter.ext.XcUserExt;
import com.xuecheng.ucenter.dao.XcCompanyUserRepository;
import com.xuecheng.ucenter.dao.XcUserRepository;
import org.springframework.beans.BeanUtils;
import org.springframework.beans.factory.annotation.Autowired;
import org.springframework.stereotype.Service;
@Service
public class UserService {
@Autowired
private XcUserRepository xcUserRepository;
@Autowired
private XcCompanyUserRepository xcCompanyUserRepository;
public XcUserExt findByUsername(String username) {
XcUserExt result = new XcUserExt();
XcUser userInfo = xcUserRepository.findByUsername(username);
if (userInfo == null) {
return null;
}
BeanUtils.copyProperties(userInfo, result);
XcCompanyUser companyUser = xcCompanyUserRepository.findByUserId(userInfo.getId());
if (companyUser != null) {
result.setCompanyId(companyUser.getCompanyId());
}
return result;
}
}
|
XcUserRepository & XcCompanyUserRepository
XcUserRepository
1
2
3
4
5
6
7
8
9
10
| package com.xuecheng.ucenter.dao;
import com.xuecheng.framework.domain.ucenter.XcUser;
import org.springframework.data.jpa.repository.JpaRepository;
public interface XcUserRepository extends JpaRepository<XcUser, String> {
XcUser findByUsername(String username);
}
|
XcCompanyUserRepository
1
2
3
4
5
6
7
8
9
10
| package com.xuecheng.ucenter.dao;
import com.xuecheng.framework.domain.ucenter.XcCompanyUser;
import org.springframework.data.jpa.repository.JpaRepository;
public interface XcCompanyUserRepository extends JpaRepository<XcCompanyUser, String> {
XcCompanyUser findByUserId(String userId);
}
|
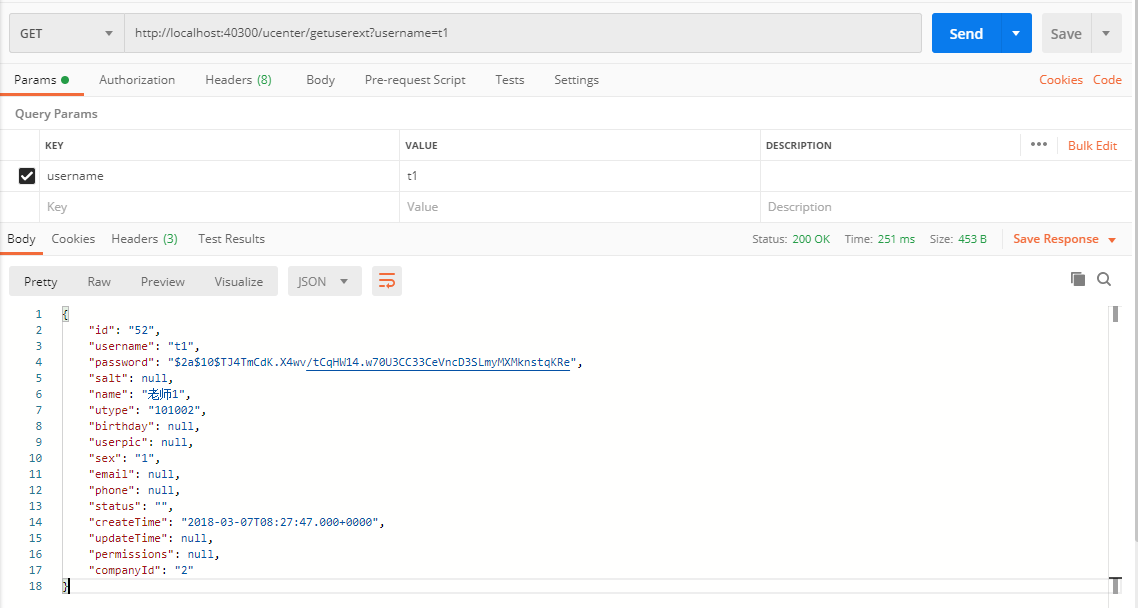
接口测试
访问接口:
1
| GET http://localhost:40300/ucenter/getuserext?username=t1
|
正常查询到数据:
编写Feign客户端
1
2
3
4
5
6
7
8
9
10
11
12
13
14
15
| package com.xuecheng.auth;
import com.xuecheng.framework.client.XcServiceList;
import com.xuecheng.framework.domain.ucenter.ext.XcUserExt;
import org.springframework.cloud.openfeign.FeignClient;
import org.springframework.web.bind.annotation.GetMapping;
import org.springframework.web.bind.annotation.RequestParam;
@FeignClient(XcServiceList.XC_SERVICE_UCENTER)
public interface UserClient {
@GetMapping("ucenter/getuserext")
XcUserExt findByUsername(@RequestParam("username") String username);
}
|
修改UserDetailsServiceImpl逻辑
修改xc-service-ucenter-auth的UserDetailsServiceImpl部分逻辑,采用查询远程调用Ucenter的API获取用户数据,然后与前端登录的用户信息进行比对。
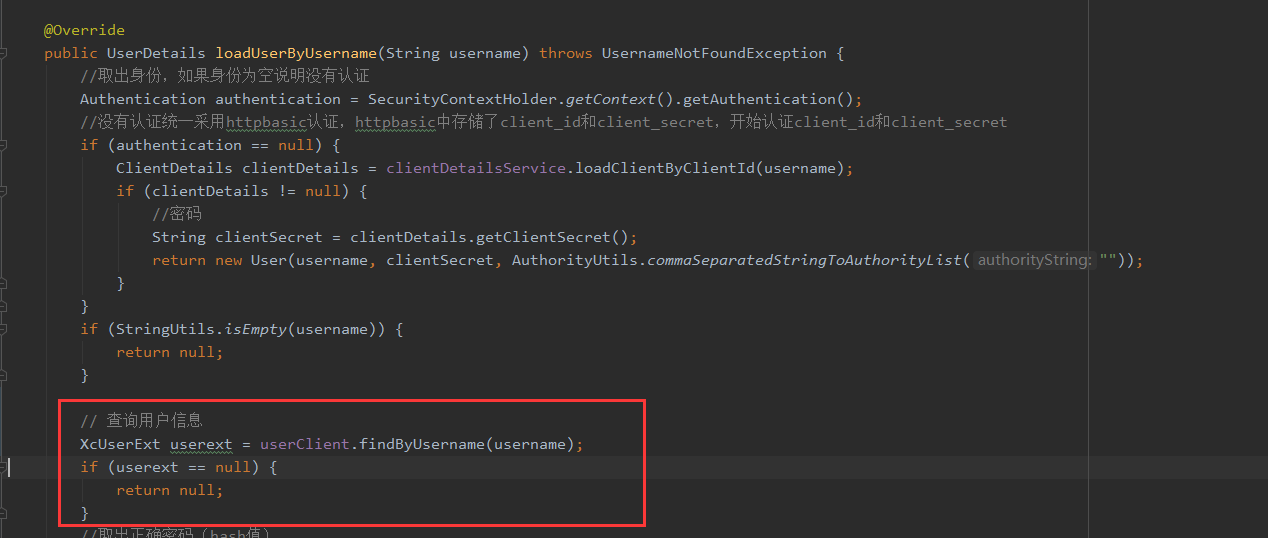
下面修改后的loadUserByUsername方法的代码
1
2
3
4
5
6
7
8
9
10
11
12
13
14
15
16
17
18
19
20
21
22
23
24
25
26
27
28
29
30
31
32
33
34
| public UserDetails loadUserByUsername(String username) throws UsernameNotFoundException {
Authentication authentication = SecurityContextHolder.getContext().getAuthentication();
if (authentication == null) {
ClientDetails clientDetails = clientDetailsService.loadClientByClientId(username);
if (clientDetails != null) {
String clientSecret = clientDetails.getClientSecret();
return new User(username, clientSecret, AuthorityUtils.commaSeparatedStringToAuthorityList(""));
}
}
if (StringUtils.isEmpty(username)) {
return null;
}
XcUserExt userext = userClient.findByUsername(username);
if (userext == null) {
return null;
}
String password = userext.getPassword();
String user_permission_string = "";
UserJwt userDetails = new UserJwt(username,
password,
AuthorityUtils.commaSeparatedStringToAuthorityList(user_permission_string));
userDetails.setId(userext.getId());
userDetails.setUtype(userext.getUtype());
userDetails.setCompanyId(userext.getCompanyId());
userDetails.setName(userext.getName());
userDetails.setUserpic(userext.getUserpic());
return userDetails;
}
|
测试登录

成功登录
用户登录前端
已经是做好了的,代码不需要动,就不做笔记了。
显示当前登录的用户信息
解决方案
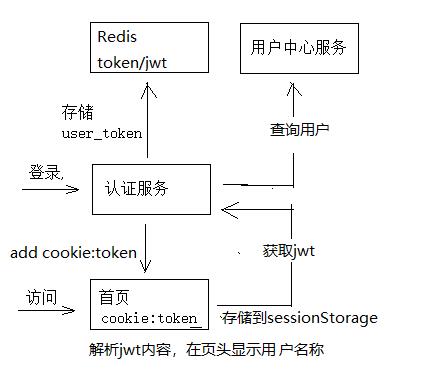
- 用户请求认证服务,登录成功。
- 用户登录成功,认证服务向
cookie写入身份令牌,向redis写入user_token(身份令牌及授权jwt授权令牌)
- 客户端携带
cookie中的身份令牌请求认证服务获取jwt令牌。
- 客户端解析
jwt令牌,并将解析的用户信息存储到sessionStorage中。jwt令牌中包括了用户的基本信息,客户端解析jwt令牌即可获取用户信息。
- 客户端从
sessionStorage中读取用户信息,并在页头显示。
后端:JWT查询接口
在AuthControllerApi中新增API
1
2
| @ApiOperation("查询user jwt令牌")
JwtResult userjwt();
|
API实现
1
2
3
4
5
6
7
8
9
10
11
12
13
14
15
16
17
18
| @Override
@GetMapping("userjwt")
public JwtResult userjwt() {
String access_token = getTokenFormCookie();
AuthToken authToken = authService.getUserToken(access_token);
if(authToken == null){
return new JwtResult(CommonCode.FAIL,null);
}
return new JwtResult(CommonCode.SUCCESS,authToken.getJwt_token());
}
private String getTokenFormCookie(){
HttpServletRequest request = ((ServletRequestAttributes)
RequestContextHolder.getRequestAttributes()).getRequest();
Map<String, String> cookieMap = CookieUtil.readCookie(request, "uid");
return cookieMap.get("uid");
}
|
AuthService新增方法
1
2
3
4
5
6
7
8
9
10
11
12
13
14
15
16
17
18
|
public AuthToken getUserToken(String access_token) {
String userToken = "user_token:" + access_token;
String userTokenString = stringRedisTemplate.opsForValue().get(userToken);
AuthToken authToken = null;
try {
authToken = JSON.parseObject(userTokenString, AuthToken.class);
} catch (Exception e) {
LOGGER.error("getUserToken from redis and execute JSON.parseObject error {}", e.getMessage());
e.printStackTrace();
}
return authToken;
}
|
测试
调用登陆过后,调用userjwt接口
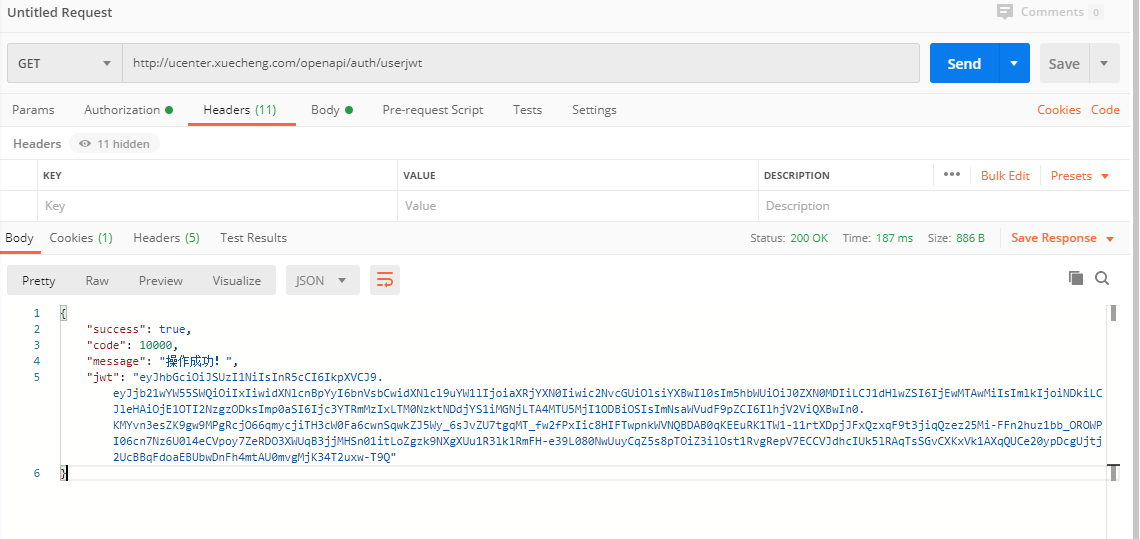
成功获取到jwt令牌
前端:调用API获取JWT
代码写好了的,配置一下nginx就完事了。
用户退出(省略)
清除Redis和Cookie中的token
Zuul 网关
Zuul 网关概述
参考文章:👉Spring Cloud Zuul网关👈
网关项目导入(省略)
配置路由
1
2
3
4
5
6
7
8
9
10
11
12
13
14
15
16
17
18
19
20
21
22
23
24
25
26
27
28
29
30
31
32
| zuul:
routes:
xc-service-learning:
path: /learning/**
serviceId: xc-service-learning
strip-prefix: false
sensitiveHeaders:
manage-course:
path: /course/**
serviceId: xc-service-manage-course
strip-prefix: false
sensitiveHeaders:
manage-cms:
path: /cms/**
serviceId: xc-service-manage-cms
strip-prefix: false
sensitiveHeaders:
manage-sys:
path: /sys/**
serviceId: xc-service-manage-cms
strip-prefix: false
sensitiveHeaders:
service-ucenter:
path: /ucenter/**
serviceId: xc-service-ucenter
sensitiveHeaders:
strip-prefix: false
xc-service-manage-order:
path: /order/**
serviceId: xc-service-manage-order
sensitiveHeaders:
strip-prefix: false
|
AuthService
在gateway项目中编写AuthService
1
2
3
4
5
6
7
8
9
10
11
12
13
14
15
16
17
18
19
20
21
22
23
24
25
26
27
28
29
30
31
32
33
34
35
36
37
38
39
40
41
42
43
44
45
46
| package com.xuecheng.govern.gateway.service;
import com.xuecheng.framework.utils.CookieUtil;
import org.apache.commons.lang3.StringUtils;
import org.springframework.beans.factory.annotation.Autowired;
import org.springframework.data.redis.core.StringRedisTemplate;
import javax.servlet.http.HttpServletRequest;
import java.util.Map;
public class AuthService {
@Autowired
StringRedisTemplate stringRedisTemplate;
public String getTokenFromCookie(HttpServletRequest request) {
Map<String, String> cookieMap = CookieUtil.readCookie(request, "uid");
String access_token = cookieMap.get("uid");
if (StringUtils.isEmpty(access_token)) {
return null;
}
return access_token;
}
public String getJwtFromHeader(HttpServletRequest request) {
String authorization = request.getHeader("Authorization");
if (StringUtils.isEmpty(authorization)) {
return null;
}
if (!authorization.startsWith("Bearer ")) {
return null;
}
return authorization;
}
public long getExpire(String access_token) {
String key = "user_token:" + access_token;
return stringRedisTemplate.getExpire(key);
}
}
|
过滤器
在gateway项目中编写过滤器
1
2
3
4
5
6
7
8
9
10
11
12
13
14
15
16
17
18
19
20
21
22
23
24
25
26
27
28
29
30
31
32
33
34
35
36
37
38
39
40
41
42
43
44
45
46
47
48
49
50
51
52
53
54
55
56
57
58
59
60
61
62
63
64
65
66
67
68
69
70
71
72
73
74
75
76
77
78
79
80
81
82
83
84
85
86
87
| package com.xuecheng.govern.gateway.filter;
import com.alibaba.fastjson.JSON;
import com.netflix.zuul.ZuulFilter;
import com.netflix.zuul.context.RequestContext;
import com.netflix.zuul.exception.ZuulException;
import com.xuecheng.framework.model.response.CommonCode;
import com.xuecheng.framework.model.response.ResponseResult;
import com.xuecheng.govern.gateway.service.AuthService;
import org.slf4j.Logger;
import org.slf4j.LoggerFactory;
import org.springframework.beans.factory.annotation.Autowired;
import org.springframework.stereotype.Component;
import javax.servlet.http.HttpServletRequest;
@Component
public class LoginFilter extends ZuulFilter {
private static final Logger LOG = LoggerFactory.getLogger(LoginFilter.class);
@Autowired
private AuthService authService;
@Override
public String filterType() {
return "pre";
}
@Override
public int filterOrder() {
return 0;
}
@Override
public boolean shouldFilter() {
return true;
}
@Override
public Object run() throws ZuulException {
RequestContext requestContext = RequestContext.getCurrentContext();
HttpServletRequest request = requestContext.getRequest();
String access_token = authService.getTokenFromCookie(request);
if (access_token == null) {
access_denied();
return null;
}
long expire = authService.getExpire(access_token);
if (expire <= 0) {
access_denied();
return null;
}
String jwt = authService.getJwtFromHeader(request);
if (jwt == null) {
access_denied();
return null;
}
return null;
}
private void access_denied() {
RequestContext requestContext = RequestContext.getCurrentContext();
requestContext.setSendZuulResponse(false);
ResponseResult responseResult = new ResponseResult(CommonCode.UNAUTHENTICATED);
String responseResultString = JSON.toJSONString(responseResult);
requestContext.setResponseBody(responseResultString);
requestContext.setResponseStatusCode(200);
requestContext.getResponse().setContentType("application/json;charset=utf-8");
}
}
|
配置Nginx
1
2
3
4
5
6
7
8
| #微服务网关, 配置在server外部
upstream api_server_pool{
server 127.0.0.1:50201 weight=10;
}
#微服务网关, 配置在监听80端口的server内部
location /api {
proxy_pass http://api_server_pool;
}
|
测试
使用token调用API
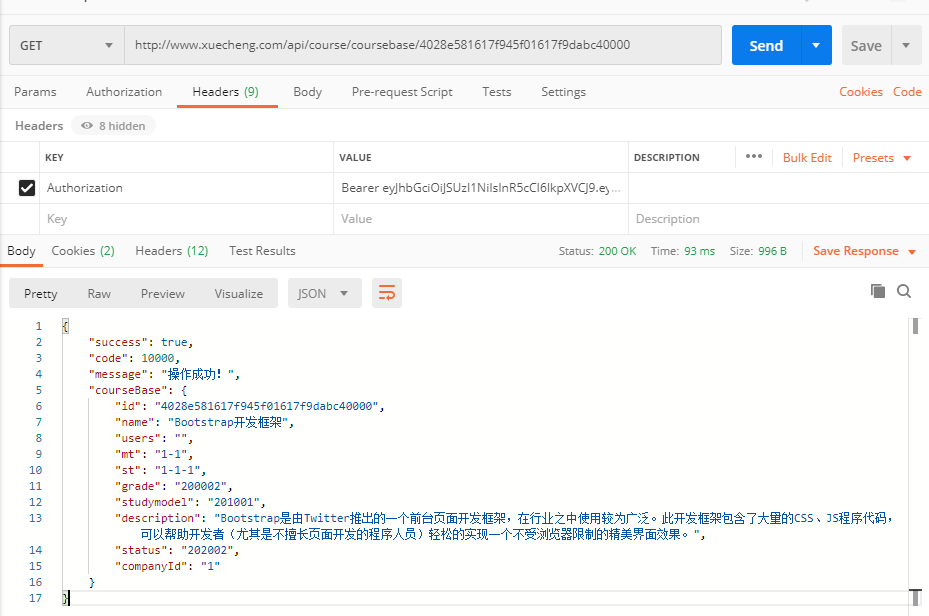
代码获取
代码获取


