Spring Security OAuth2 以及 JWT 相关

用户认证需求分析
用户认证与授权
什么是用户身份认证?
用户身份认证即用户去访问系统资源时系统要求验证用户的身份信息,身份合法方可继续访问。常见的用户身份认证表现形式有:用户名密码登录,指纹打卡等方式。
什么是用户授权?
用户认证通过后去访问系统的资源,系统会判断用户是否拥有访问资源的权限,只允许访问有权限的系统资源,没有权限的资源将无法访问,这个过程叫用户授权。
单点登录需求
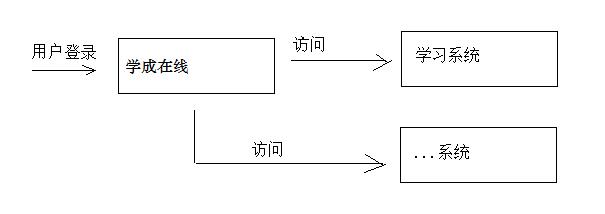
本项目包括多个子项目,如:学习系统,教学管理中心、系统管理中心等,为了提高用户体验性需要实现用户只认证一次便可以在多个拥有访问权限的系统中访问,这个功能叫做单点登录。
引用百度百科:单点登录(Single Sign On),简称为SSO,是目前比较流行的企业业务整合的解决方案之一。SSO的定义是在多个应用系统中,用户只需要登录一次就可以访问所有相互信任的应用系统。
下图是SSO的示意图,用户登录学成网一次即可访问多个系统。
第三方认证需求
作为互联网项目难免需要访问外部系统的资源,同样本系统也要访问第三方系统的资源接口,一个场景如下:
一个微信用户没有在学成在线注册,本系统可以通过请求微信系统来验证该用户的身份,验证通过后该用户便可在本系统学习,它的基本流程如下:
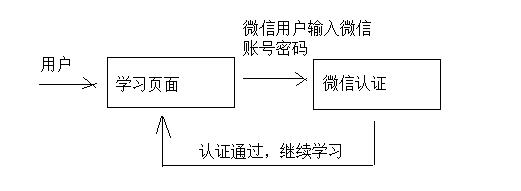
从上图可以看出,微信不属于本系统,本系统并没有存储微信用户的账号、密码等信息,本系统如果要获取该用户的基本信息则需要首先通过微信的认证系统(微信认证)进行认证,微信认证通过后本系统便可获取该微信用户的基本信息,从而在本系统将该微信用户的头像、昵称等信息显示出来,该用户便不用在本系统注册却可以直接学习。
什么是第三方认证(跨平台认证)?
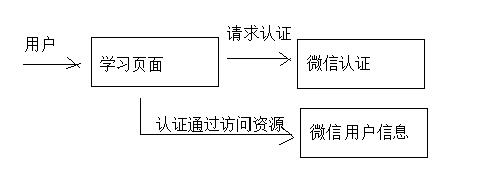
当需要访问第三方系统的资源时需要首先通过第三方系统的认证(例如:微信认证),由第三方系统对用户认证通过,并授权资源的访问权限。
用户认证技术方案
单点登录技术方案
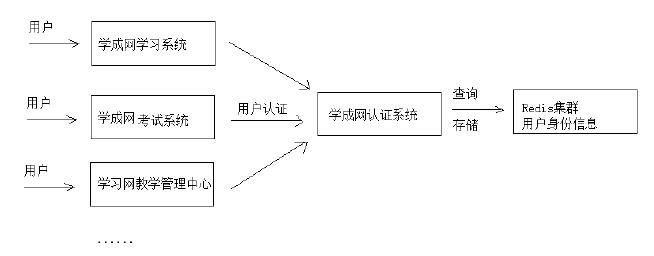
分布式系统要实现单点登录,通常将认证系统独立抽取出来,并且将用户身份信息存储在单独的存储介质,比如:MySQL、Redis,考虑性能要求,通常存储在Redis中,如下图:
单点登录的特点是:
- 认证系统为独立的系统。
- 各子系统通过Http或其它协议与认证系统通信,完成用户认证。
- 用户身份信息存储在Redis集群。
Oauth2认证流程
第三方认证技术方案最主要是解决认证协议的通用标准问题,因为要实现跨系统认证,各系统之间要遵循一定的接口协议。
Oauth协议为用户资源的授权提供了一个安全的、开放而又简易的标准。同时,任何第三方都可以使用Oauth认证服务,任何服务提供商都可以实现自身的Oauth认证服务,因而Oauth是开放的。业界提供了Oauth的多实现如PHP、JavaScript,Java,Ruby等各种语言开发包,大大节约了程序员的时间,因而Oauth是简易的。互网很多服务如Open API,很多大公司如Google,Yahoo,Microsoft等都提供了Oauth认证服务,这些都足以说明Oauth标准逐渐成为开放资源授权的标准。
黑马程序员网站使用微信认证的过程:
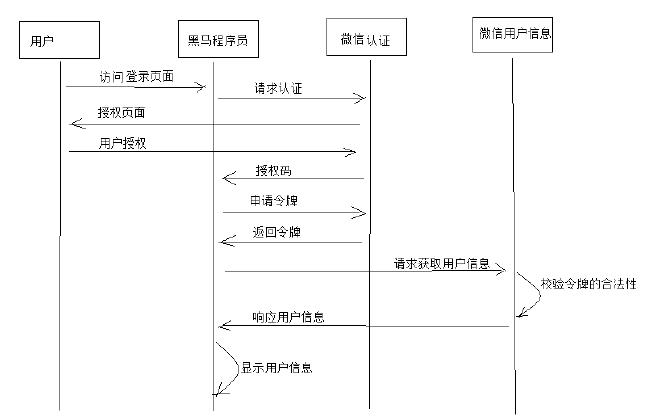
- 客户端请求第三方授权。
- 资源拥有者同意给客户端授权。
- 客户端获取到授权码,请求认证服务器申请令牌。
- 认证服务器向客户端响应令牌。
- 客户端请求资源服务器的资源。
- 资源服务器返回受保护资源。
Oauth2.0认证流程如下:
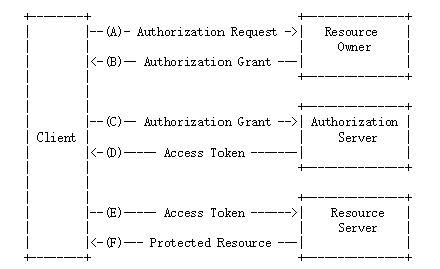
Oauth2包括以下角色:
- 客户端
本身不存储资源,需要通过资源拥有者的授权去请求资源服务器的资源,比如:学成在线Android客户端、学成在线Web客户端(浏览器端)、微信客户端等。
- 资源拥有者
通常为用户,也可以是应用程序,即该资源的拥有者。
- 授权服务器(也称认证服务器)
用来对资源拥有的身份进行认证、对访问资源进行授权。客户端要想访问资源需要通过认证服务器由资源拥有者授权后方可访问。
- 资源服务器
存储资源的服务器,比如,学成网用户管理服务器存储了学成网的用户信息,学成网学习服务器存储了学生的学习信息,微信的资源服务存储了微信的用户信息等。客户端最终访问资源服务器获取资源信息。
Spring Security Oauth2
本项目采用Spring security + Oauth2完成用户认证及用户授权,Spring security 是一个强大的和高度可定制的身份验证和访问控制框架,Spring security 框架集成了Oauth2协议,下图是项目认证架构图:
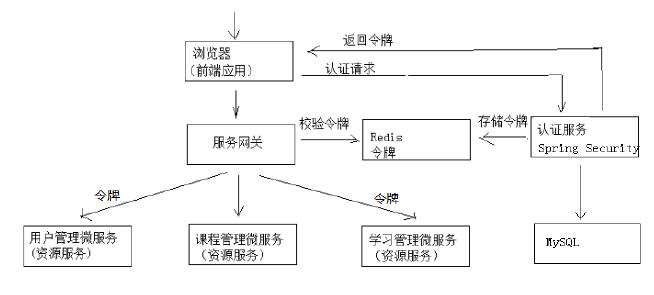
- 用户请求认证服务完成认证。
- 认证服务下发用户身份令牌,拥有身份令牌表示身份合法。
- 用户携带令牌请求资源服务,请求资源服务必先经过网关。
- 网关校验用户身份令牌的合法,不合法表示用户没有登录,如果合法则放行继续访问。
- 资源服务获取令牌,根据令牌完成授权。
- 资源服务完成授权则响应资源信息。
Spring Security Oauth2应用
导入工程、建表(省略)
授权码流程
授权码流程见流程图
申请授权码
启动项目
启动nginx
访问路径
1
| http://localhost:40400/auth/oauth/authorize?client_id=XcWebApp&response_type=code&scop=app&redirect_uri=http://localhost
|
输入账号密码,账号为:client_id,密码为:client_secret,下面为登录成功后的界面。

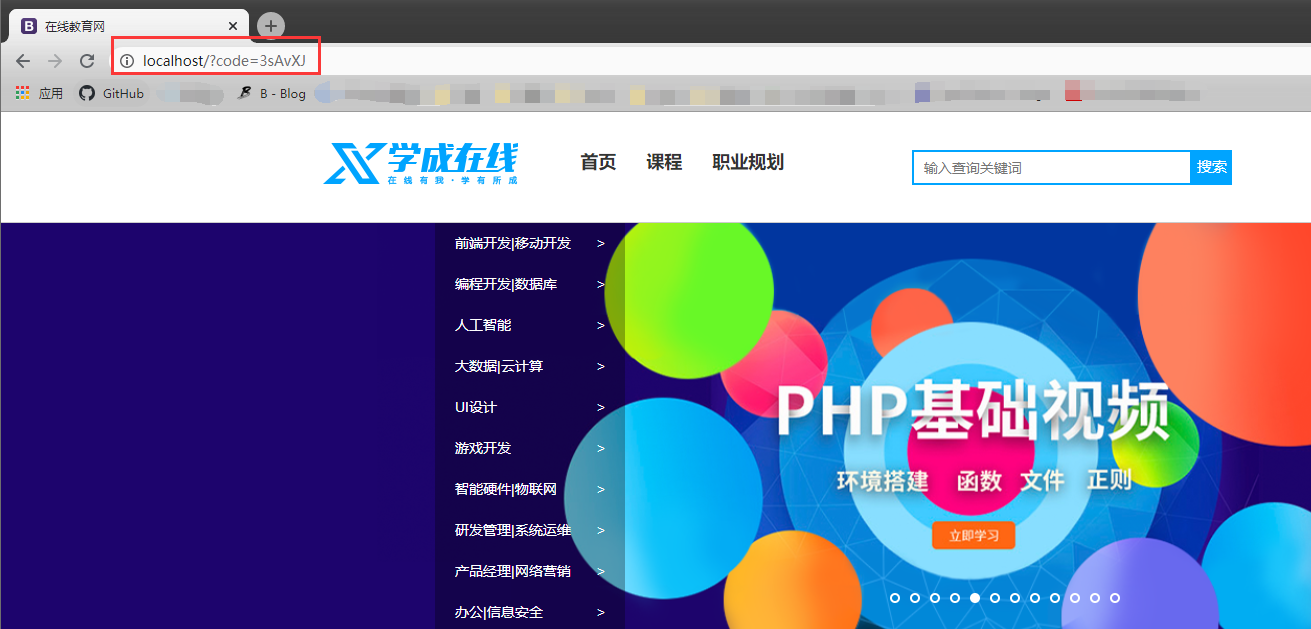
点击Authorize按钮完成授权并跳转到学成在线首页,可以看到URL路径后面带上了code参数。
申请令牌
截图的时候忘了换POST请求
使用POST请求:http://localhost:40400/auth/oauth/token
填写请求参数
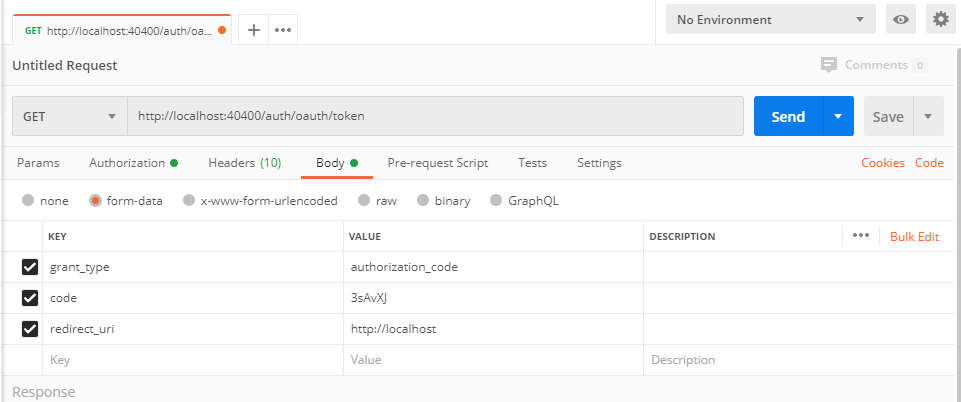
grant_type:授权类型,填写authorization_code,表示授权码模式。
code:授权码,就是刚刚获取的授权码,注意:授权码只使用一次就无效了,需要重新申请。
redirect_uri:申请授权码时的跳转url,一定和申请授权码时用的redirect_uri一致。
选择Authorization模式
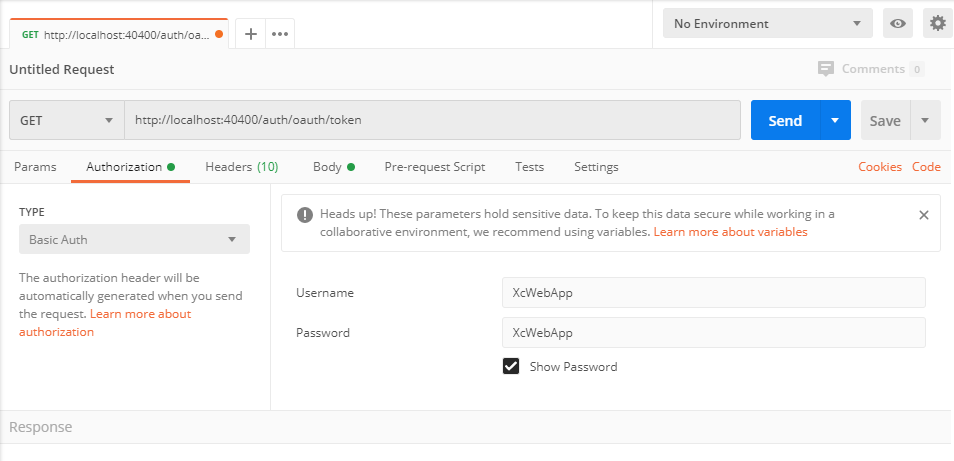
点击Send,发送请求
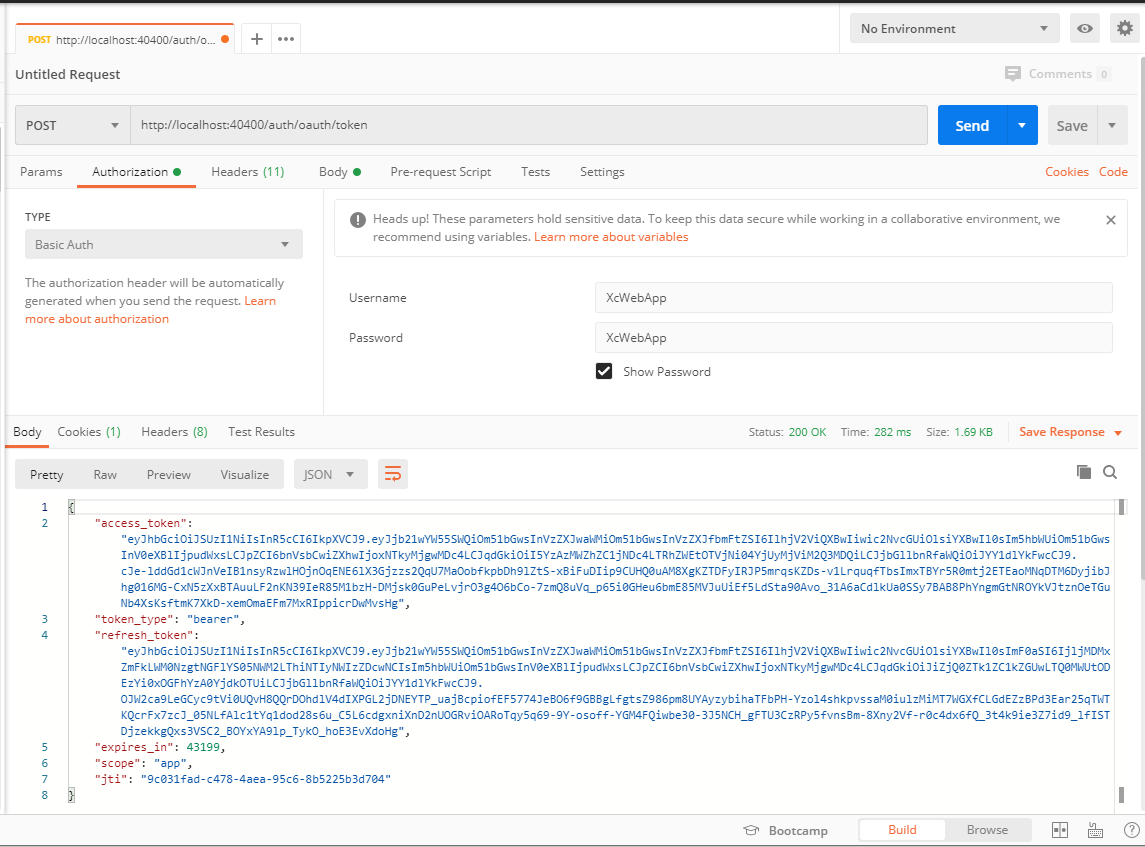
access_token:访问令牌,携带此令牌访问资源。
token_type:有MAC Token与Bearer Token两种类型,两种的校验算法不同,RFC 6750建议Oauth2采用Bearer Token。
refresh_token:刷新令牌,使用此令牌可以延长访问令牌的过期时间。
expires_in:过期时间,单位为秒。
scope:范围,与定义的客户端范围一致。
资源服务授权
微服务即为资源服务,各个微服务中的API就是获取其资源的办法。
资源服务授权流程
资源服务拥有要访问的受保护资源,客户端携带令牌访问资源服务,如果令牌合法则可成功访问资源服务中的资源。
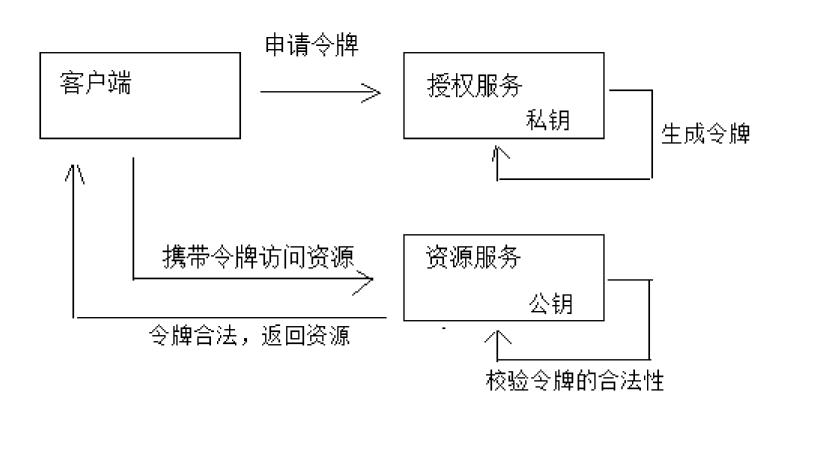
- 客户端请求认证服务申请令牌
- 认证服务生成令牌。认证服务采用非对称加密算法,使用私钥生成令牌。
- 客户端携带令牌访问资源服务。客户端在
Http header 中添加:Authorization:Bearer 令牌。
- 资源服务请求认证服务校验令牌的有效性。资源服务接收到令牌,使用公钥校验令牌的合法性。
- 令牌有效,资源服务向客户端响应资源信息
资源服务授权配置
配置公钥
认证服务生成令牌采用非对称加密算法,认证服务采用私钥加密生成令牌,对外向资源服务提供公钥,资源服务使用公钥来校验令牌的合法性。
将公钥拷贝到publickey.txt文件中,将此文件拷贝到资源服务工程的classpath下
引入依赖
1
2
3
4
| <dependency>
<groupId>org.springframework.cloud</groupId>
<artifactId>spring-cloud-starter-oauth2</artifactId>
</dependency>
|
编写配置类
1
2
3
4
5
6
7
8
9
10
11
12
13
14
15
16
17
18
19
20
21
22
23
24
25
26
27
28
29
30
31
32
33
34
35
36
37
38
39
40
41
42
43
44
45
46
47
48
49
50
51
52
53
54
55
56
57
58
59
60
61
62
63
64
65
| package com.xuecheng.auth.config;
import org.springframework.context.annotation.Bean;
import org.springframework.context.annotation.Configuration;
import org.springframework.core.io.ClassPathResource;
import org.springframework.core.io.Resource;
import org.springframework.security.config.annotation.method.configuration.EnableGlobalMethodSecurity;
import org.springframework.security.config.annotation.web.builders.HttpSecurity;
import org.springframework.security.oauth2.config.annotation.web.configuration.EnableResourceServer;
import org.springframework.security.oauth2.config.annotation.web.configuration.ResourceServerConfigurerAdapter;
import org.springframework.security.oauth2.provider.token.TokenStore;
import org.springframework.security.oauth2.provider.token.store.JwtAccessTokenConverter;
import org.springframework.security.oauth2.provider.token.store.JwtTokenStore;
import java.io.BufferedReader;
import java.io.IOException;
import java.io.InputStreamReader;
import java.util.stream.Collectors;
@Configuration
@EnableResourceServer
@EnableGlobalMethodSecurity(prePostEnabled = true, securedEnabled = true)
public class ResourceServerConfig extends ResourceServerConfigurerAdapter {
private static final String PUBLIC_KEY = "publickey.txt";
@Bean
public TokenStore tokenStore(JwtAccessTokenConverter jwtAccessTokenConverter) {
return new JwtTokenStore(jwtAccessTokenConverter);
}
@Bean
public JwtAccessTokenConverter jwtAccessTokenConverter() {
JwtAccessTokenConverter converter = new JwtAccessTokenConverter();
converter.setVerifierKey(getPubKey());
return converter;
}
private String getPubKey() {
Resource resource = new ClassPathResource(PUBLIC_KEY);
try {
InputStreamReader inputStreamReader = new
InputStreamReader(resource.getInputStream());
BufferedReader br = new BufferedReader(inputStreamReader);
return br.lines().collect(Collectors.joining("\n"));
} catch (IOException ioe) {
return null;
}
}
@Override
public void configure(HttpSecurity http) throws Exception {
http.authorizeRequests().anyRequest().authenticated();
}
}
|
资源服务授权测试
直接访问:http://localhost:31200/course/coursepic/list/4028e58161bd3b380161bd3bcd2f0000,显示权限不足。

请求带上token,再次访问。成功获取数据
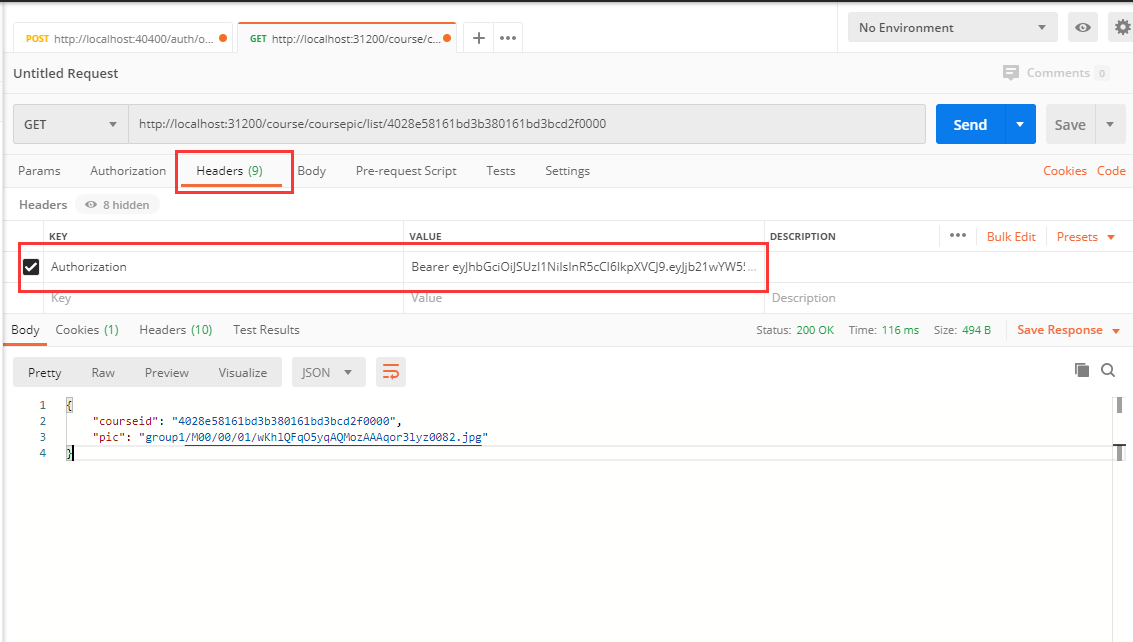
swagger-ui无法访问解决
修改配置类,配置需要放行的路径
1
2
3
4
5
6
7
8
9
10
11
|
@Override
public void configure(HttpSecurity http) throws Exception {
http.authorizeRequests()
.antMatchers("/v2/api‐docs", "/swagger‐resources/configuration/ui",
"/swagger‐resources", "/swagger‐resources/configuration/security",
"/swagger‐ui.html", "/webjars/**").permitAll()
.anyRequest().authenticated();
}
|
密码授权模式
比较简单,主要说下流程。
- 还是需要传递
client_id和client_secret,但是grant_type是password,验证客户端是否正确
- 若正确,验证账号密码是否正确
- 若正确,颁发
token
校验令牌
发送请求
1
| GET auth/oauth/check_token?token=
|
参数
token:申请到的token
刷新令牌
发送请求
参数
grant_type:refresh_token
refresh_token:申请到的refresh_token
JWT
👉JWT参考这里👈
感觉这个介绍JWT要全一点
生成RSA密钥对
生成私钥
1
| keytool -genkeypair -alias xckey -keyalg RSA -keypass xuecheng -keystore xc.keystore -storepass imxushuai-xuecheng
|
keytool命令参数介绍:
- alias:密钥的别名
- keyalg:使用的hash算法
- keypass:密钥的访问密码
- keystore:密钥库文件名,xc.keystore保存了生成的证书
- storepass:密钥库的访问密码
查询证书信息的命令:
keytool -list -keystore xc.keystore
生成公钥
若未安装openssl,需要先安装
安装openssl:http://slproweb.com/products/Win32OpenSSL.html
配置openssl的环境变量
1
| keytool ‐list ‐rfc ‐‐keystore xc.keystore | openssl x509 ‐inform pem ‐pubkey
|
PUBLIC KEY部分就是公钥,复制出来合并到一行
认证服务开发
流程分析
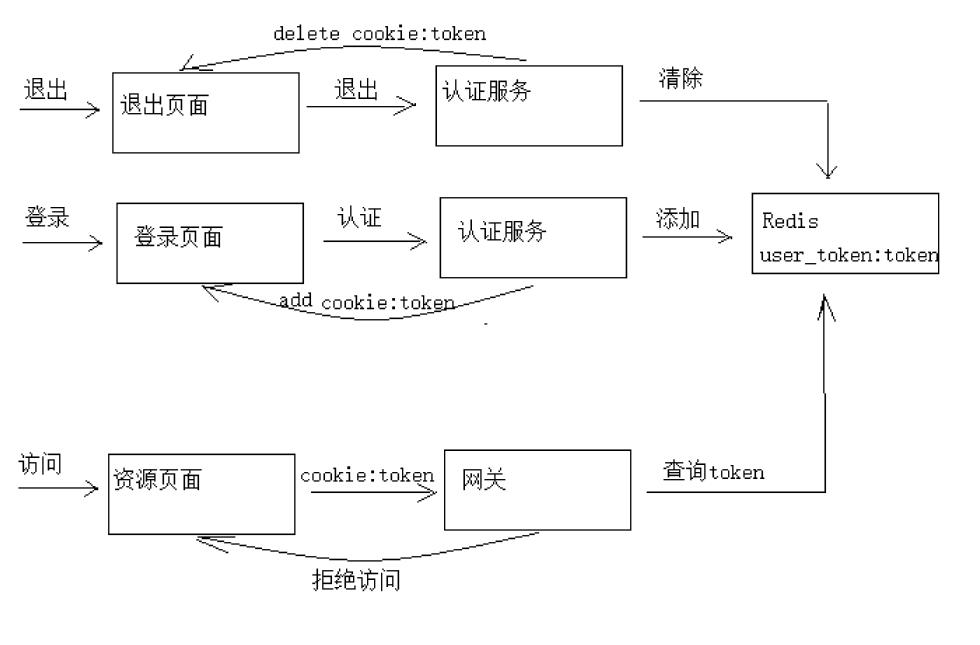
执行流程:
- 用户登录,请求认证服务
- 认证服务认证通过,生成jwt令牌,将jwt令牌及相关信息写入Redis,并且将身份令牌写入cookie
- 用户访问资源页面,带着cookie到网关
- 网关从cookie获取token,并查询Redis校验token,如果token不存在则拒绝访问,否则放行
- 用户退出,请求认证服务,清除redis中的token,并且删除cookie中的token
使用redis存储用户的身份令牌有以下作用:
- 实现用户退出注销功能,服务端清除令牌后,即使客户端请求携带token也是无效的。
- 由于jwt令牌过长,不宜存储在cookie中,所以将jwt令牌存储在redis,由客户端请求服务端获取并在客户端存
储。
API接口定义
1
2
3
4
5
6
7
8
9
10
11
12
13
14
15
16
17
18
| package com.xuecheng.api.auth;
import com.xuecheng.framework.domain.ucenter.request.LoginRequest;
import com.xuecheng.framework.domain.ucenter.response.LoginResult;
import com.xuecheng.framework.model.response.ResponseResult;
import io.swagger.annotations.Api;
import io.swagger.annotations.ApiOperation;
@Api(value = "用户认证",description = "用户认证接口")
public interface AuthControllerApi {
@ApiOperation("登录")
LoginResult login(LoginRequest loginRequest);
@ApiOperation("退出")
ResponseResult logout();
}
|
配置认证客户端信息
1
2
3
4
5
6
| auth:
tokenValiditySeconds: 1200
clientId: XcWebApp
clientSecret: XcWebApp
cookieDomain: imxushuai.com
cookieMaxAge: -1
|
AuthCode
1
2
3
4
5
6
7
8
9
10
11
12
13
14
15
16
17
18
19
20
21
22
23
24
25
26
27
28
29
30
31
32
33
34
35
36
37
38
39
40
41
42
43
44
45
46
47
48
49
50
51
52
53
54
55
56
57
58
59
60
61
62
63
| package com.xuecheng.framework.domain.ucenter.response;
import com.google.common.collect.ImmutableMap;
import com.xuecheng.framework.model.response.ResultCode;
import io.swagger.annotations.ApiModelProperty;
import lombok.ToString;
@ToString
public enum AuthCode implements ResultCode {
AUTH_USERNAME_NONE(false,23001,"请输入账号!"),
AUTH_PASSWORD_NONE(false,23002,"请输入密码!"),
AUTH_VERIFYCODE_NONE(false,23003,"请输入验证码!"),
AUTH_ACCOUNT_NOTEXISTS(false,23004,"账号不存在!"),
AUTH_CREDENTIAL_ERROR(false,23005,"账号或密码错误!"),
AUTH_LOGIN_ERROR(false,23006,"登陆过程出现异常请尝试重新操作!"),
AUTH_LOGIN_APPLY_TOKEN_FAIL(false, 24001, "申请令牌失败"),
AUTH_LOGIN_TOKEN_SAVE_FAIL(false, 24002, "TOKEN保存到Redis失败"),
AUTH_LOGIN_AUTHSERVER_NOTFOUND(false, 24003, "未找到运行中的认证服务器");
@ApiModelProperty(value = "操作是否成功", example = "true", required = true)
boolean success;
@ApiModelProperty(value = "操作代码", example = "22001", required = true)
int code;
@ApiModelProperty(value = "操作提示", example = "操作过于频繁!", required = true)
String message;
private AuthCode(boolean success, int code, String message){
this.success = success;
this.code = code;
this.message = message;
}
private static final ImmutableMap<Integer, AuthCode> CACHE;
static {
final ImmutableMap.Builder<Integer, AuthCode> builder = ImmutableMap.builder();
for (AuthCode commonCode : values()) {
builder.put(commonCode.code(), commonCode);
}
CACHE = builder.build();
}
@Override
public boolean success() {
return success;
}
@Override
public int code() {
return code;
}
@Override
public String message() {
return message;
}
}
|
AuthService
1
2
3
4
5
6
7
8
9
10
11
12
13
14
15
16
17
18
19
20
21
22
23
24
25
26
27
28
29
30
31
32
33
34
35
36
37
38
39
40
41
42
43
44
45
46
47
48
49
50
51
52
53
54
55
56
57
58
59
60
61
62
63
64
65
66
67
68
69
70
71
72
73
74
75
76
77
78
79
80
81
82
83
84
85
86
87
88
89
90
91
92
93
94
95
96
97
98
99
100
101
102
103
104
105
106
107
108
109
110
111
112
113
114
115
116
117
118
119
120
121
122
123
124
125
126
127
128
129
130
131
132
133
134
135
136
137
138
139
140
141
142
143
144
145
146
147
148
149
150
151
152
153
| package com.xuecheng.auth.service;
import com.alibaba.fastjson.JSON;
import com.xuecheng.framework.client.XcServiceList;
import com.xuecheng.framework.domain.ucenter.ext.AuthToken;
import com.xuecheng.framework.domain.ucenter.response.AuthCode;
import com.xuecheng.framework.exception.ExceptionCast;
import org.slf4j.Logger;
import org.slf4j.LoggerFactory;
import org.springframework.beans.factory.annotation.Autowired;
import org.springframework.beans.factory.annotation.Value;
import org.springframework.cloud.client.ServiceInstance;
import org.springframework.cloud.client.loadbalancer.LoadBalancerClient;
import org.springframework.data.redis.core.StringRedisTemplate;
import org.springframework.http.HttpEntity;
import org.springframework.http.HttpMethod;
import org.springframework.http.ResponseEntity;
import org.springframework.http.client.ClientHttpResponse;
import org.springframework.security.crypto.codec.Base64;
import org.springframework.stereotype.Service;
import org.springframework.util.LinkedMultiValueMap;
import org.springframework.util.MultiValueMap;
import org.springframework.web.client.DefaultResponseErrorHandler;
import org.springframework.web.client.RestClientException;
import org.springframework.web.client.RestTemplate;
import java.io.IOException;
import java.util.Map;
import java.util.concurrent.TimeUnit;
@Service
public class AuthService {
private static final Logger LOGGER = LoggerFactory.getLogger(AuthService.class);
@Value("${auth.tokenValiditySeconds}")
int tokenValiditySeconds;
@Autowired
private RestTemplate restTemplate;
@Autowired
private LoadBalancerClient loadBalancerClient;
@Autowired
private StringRedisTemplate stringRedisTemplate;
public AuthToken login(String username, String password, String clientId, String clientSecret) {
AuthToken authToken = applyToken(username, password, clientId, clientSecret);
if (authToken == null) {
ExceptionCast.cast(AuthCode.AUTH_LOGIN_APPLY_TOKEN_FAIL);
}
String access_token = authToken.getAccess_token();
String content = JSON.toJSONString(authToken);
boolean saveTokenResult = saveToken(access_token, content, tokenValiditySeconds);
if (!saveTokenResult) {
ExceptionCast.cast(AuthCode.AUTH_LOGIN_TOKEN_SAVE_FAIL);
}
return authToken;
}
private boolean saveToken(String access_token, String content, long ttl) {
String name = "user_token:" + access_token;
stringRedisTemplate.boundValueOps(name).set(content, ttl, TimeUnit.SECONDS);
Long expire = stringRedisTemplate.getExpire(name);
return expire > 0;
}
private AuthToken applyToken(String username, String password, String clientId, String
clientSecret) {
ServiceInstance serviceInstance =
loadBalancerClient.choose(XcServiceList.XC_SERVICE_UCENTER_AUTH);
if (serviceInstance == null) {
LOGGER.error("choose an auth instance fail");
ExceptionCast.cast(AuthCode.AUTH_LOGIN_AUTHSERVER_NOTFOUND);
}
String path = serviceInstance.getUri().toString() + "/auth/oauth/token";
MultiValueMap<String, String> formData = new LinkedMultiValueMap<>();
formData.add("grant_type", "password");
formData.add("username", username);
formData.add("password", password);
MultiValueMap<String, String> header = new LinkedMultiValueMap<>();
header.add("Authorization", httpbasic(clientId, clientSecret));
restTemplate.setErrorHandler(new DefaultResponseErrorHandler() {
@Override
public void handleError(ClientHttpResponse response) throws IOException {
if (response.getRawStatusCode() != 400 && response.getRawStatusCode() != 401) {
super.handleError(response);
}
}
});
Map map = null;
try {
ResponseEntity<Map> mapResponseEntity = restTemplate.exchange(path, HttpMethod.POST, new HttpEntity<MultiValueMap<String, String>>(formData, header), Map.class);
map = mapResponseEntity.getBody();
} catch (RestClientException e) {
e.printStackTrace();
LOGGER.error("request oauth_token_password error: {}", e.getMessage());
e.printStackTrace();
ExceptionCast.cast(AuthCode.AUTH_LOGIN_APPLY_TOKEN_FAIL);
}
if (map == null ||
map.get("access_token") == null ||
map.get("refresh_token") == null ||
map.get("jti") == null) {
ExceptionCast.cast(AuthCode.AUTH_LOGIN_APPLY_TOKEN_FAIL);
}
AuthToken authToken = new AuthToken();
String jwt_token = (String) map.get("access_token");
String refresh_token = (String) map.get("refresh_token");
String access_token = (String) map.get("jti");
authToken.setJwt_token(jwt_token);
authToken.setAccess_token(access_token);
authToken.setRefresh_token(refresh_token);
return authToken;
}
private String httpbasic(String clientId, String clientSecret) {
String string = clientId + ":" + clientSecret;
byte[] encode = Base64.encode(string.getBytes());
return "Basic " + new String(encode);
}
}
|
AuthController
1
2
3
4
5
6
7
8
9
10
11
12
13
14
15
16
17
18
19
20
21
22
23
24
25
26
27
28
29
30
31
32
33
34
35
36
37
38
39
40
41
42
43
44
45
46
47
48
49
50
51
52
53
54
55
56
57
58
59
60
61
62
63
64
65
66
67
68
69
70
71
72
73
74
75
76
77
78
79
| package com.xuecheng.auth.controller;
import com.xuecheng.api.auth.AuthControllerApi;
import com.xuecheng.auth.service.AuthService;
import com.xuecheng.framework.domain.ucenter.ext.AuthToken;
import com.xuecheng.framework.domain.ucenter.request.LoginRequest;
import com.xuecheng.framework.domain.ucenter.response.AuthCode;
import com.xuecheng.framework.domain.ucenter.response.LoginResult;
import com.xuecheng.framework.exception.ExceptionCast;
import com.xuecheng.framework.model.response.CommonCode;
import com.xuecheng.framework.model.response.ResponseResult;
import com.xuecheng.framework.utils.CookieUtil;
import org.apache.commons.lang3.StringUtils;
import org.springframework.beans.factory.annotation.Autowired;
import org.springframework.beans.factory.annotation.Value;
import org.springframework.web.bind.annotation.PostMapping;
import org.springframework.web.bind.annotation.RestController;
import org.springframework.web.context.request.RequestContextHolder;
import org.springframework.web.context.request.ServletRequestAttributes;
import javax.servlet.http.HttpServletResponse;
@RestController
public class AuthController implements AuthControllerApi {
@Value("${auth.clientId}")
private String clientId;
@Value("${auth.clientSecret}")
private String clientSecret;
@Value("${auth.cookieDomain}")
private String cookieDomain;
@Value("${auth.cookieMaxAge}")
private int cookieMaxAge;
@Value("${auth.tokenValiditySeconds}")
private int tokenValiditySeconds;
@Autowired
private AuthService authService;
@Override
@PostMapping("/userlogin")
public LoginResult login(LoginRequest loginRequest) {
if (loginRequest == null || StringUtils.isEmpty(loginRequest.getUsername())) {
ExceptionCast.cast(AuthCode.AUTH_USERNAME_NONE);
}
if (StringUtils.isEmpty(loginRequest.getPassword())) {
ExceptionCast.cast(AuthCode.AUTH_PASSWORD_NONE);
}
AuthToken authToken = authService.login(loginRequest.getUsername(),
loginRequest.getPassword(), clientId, clientSecret);
String access_token = authToken.getAccess_token();
saveCookie(access_token);
return new LoginResult(CommonCode.SUCCESS, access_token);
}
private void saveCookie(String token) {
HttpServletResponse response = ((ServletRequestAttributes)
RequestContextHolder.getRequestAttributes()).getResponse();
CookieUtil.addCookie(response, cookieDomain, "/", "uid", token, cookieMaxAge, false);
}
@Override
@PostMapping("/userlogout")
public ResponseResult logout() {
return null;
}
}
|
认证相关URL放行
修改WebSecurityCconfig
1
2
3
4
| @Override
public void configure(WebSecurity web) throws Exception {
web.ignoring().antMatchers("/userlogin", "/userlogout", "/userjwt");
}
|
测试登录
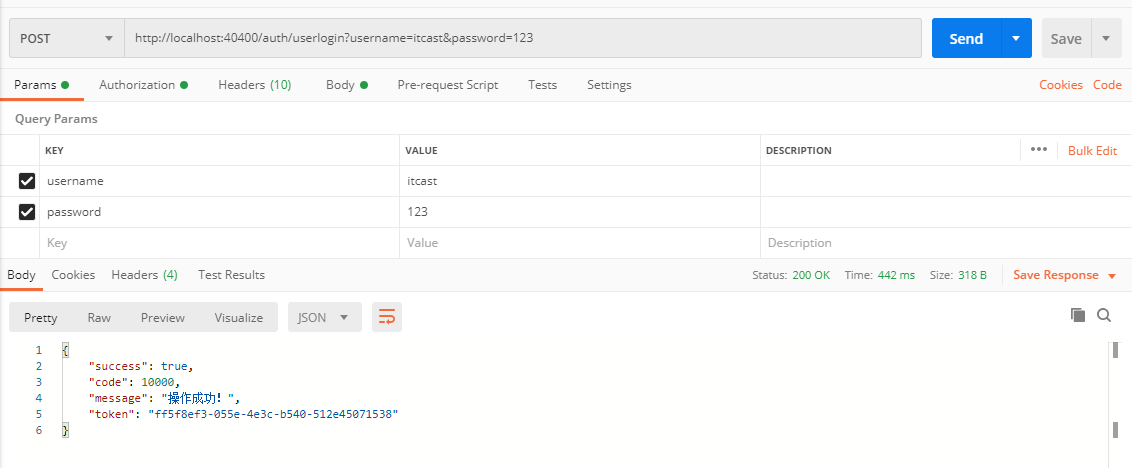
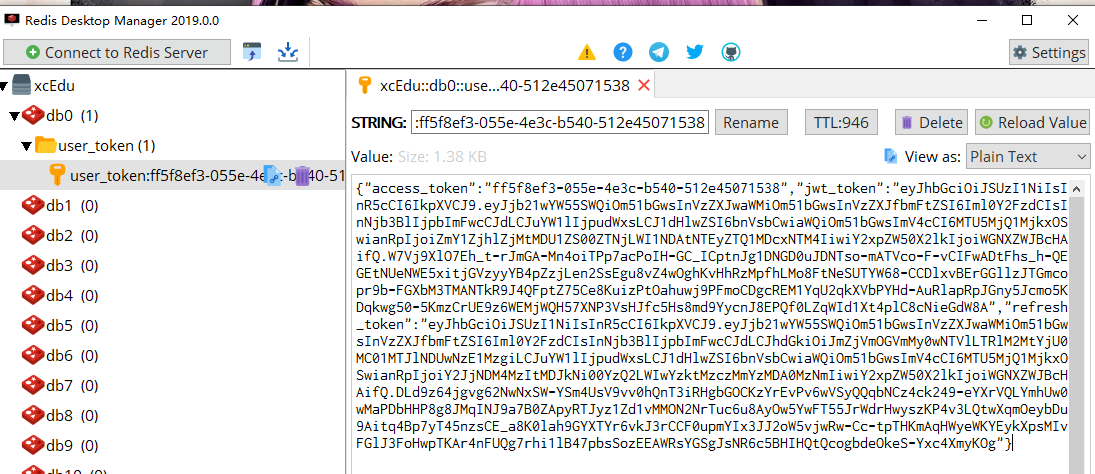
查看redis中的token
我这里用的redis-desktop-management
测试写入jti到cookie
配置nginx

运行nginx
调用请求,查看是否正确保存cookie
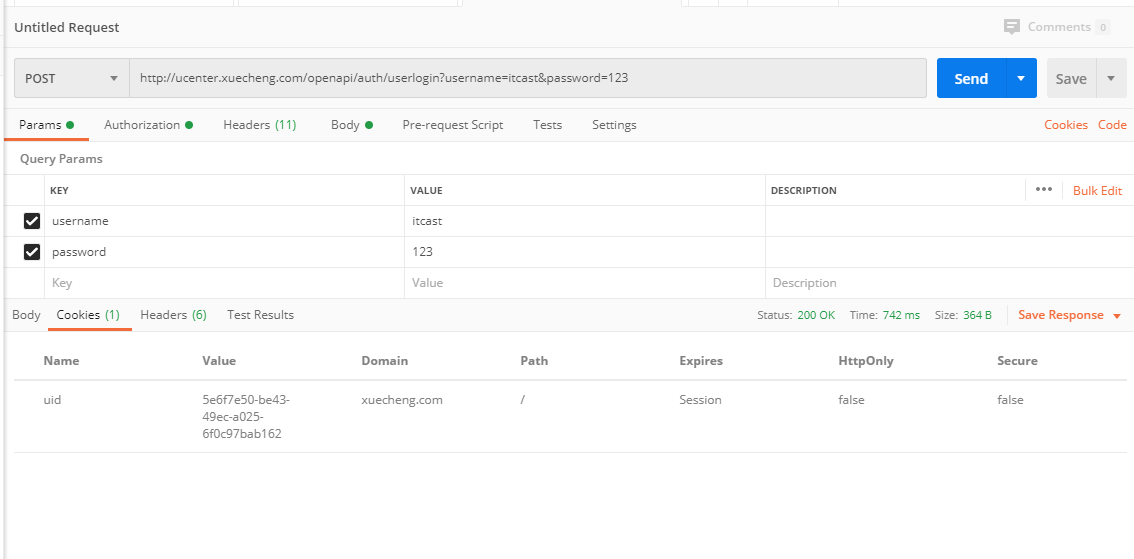
正确保存cookie
代码获取
代码获取


