注册中心与课程预览发布实现
Eureka注册中心 在前后端分离架构中,服务层被拆分成了很多的微服务,微服务的信息如何管理?Spring Cloud中提供服务注册中心来管理微服务信息。
1、微服务数量众多,要进行远程调用就需要知道服务端的ip地址和端口,注册中心帮助我们管理这些服务的ip和端口。
2、微服务会实时上报自己的状态,注册中心统一管理这些微服务的状态,将存在问题的服务踢出服务列表,客户端获取到可用的服务进行调用。
注册中心工程搭建 依赖 1 2 3 4 5 6 7 8 9 10 11 12 13 14 15 16 17 18 19 20 21 22 <?xml version="1.0" encoding="UTF-8"?> <project xmlns ="http://maven.apache.org/POM/4.0.0" xmlns:xsi ="http://www.w3.org/2001/XMLSchema-instance" xsi:schemaLocation ="http://maven.apache.org/POM/4.0.0 http://maven.apache.org/xsd/maven-4.0.0.xsd" > <parent > <artifactId > xc-framework-parent</artifactId > <groupId > com.xuecheng</groupId > <version > 1.0-SNAPSHOT</version > <relativePath > ../xc-framework-parent/pom.xml</relativePath > </parent > <modelVersion > 4.0.0</modelVersion > <artifactId > xc-govern-center</artifactId > <dependencies > <dependency > <groupId > org.springframework.cloud</groupId > <artifactId > spring-cloud-starter-netflix-eureka-server</artifactId > </dependency > </dependencies > </project >
启动类 1 2 3 4 5 6 7 8 9 10 11 12 13 package com.xuecheng.govern.center;import org.springframework.boot.SpringApplication;import org.springframework.boot.autoconfigure.SpringBootApplication;import org.springframework.cloud.netflix.eureka.server.EnableEurekaServer;@EnableEurekaServer @SpringBootApplication public class GovernCenterApplication public static void main (String[] args) SpringApplication.run(GovernCenterApplication.class, args); } }
单机版配置-application.yml 1 2 3 4 5 6 7 8 9 10 11 12 13 14 server: port: 50101 spring: application: name: xc‐govern‐center eureka: client: registerWithEureka: true fetchRegistry: true serviceUrl: defaultZone: http://localhost:50101/eureka/ server: enable‐self‐preservation: false eviction‐interval‐timer‐in‐ms: 60000
高可用版配置-application.yml 1 2 3 4 5 6 7 8 9 10 11 12 13 14 15 16 server: port: ${PORT:50101} spring: application: name: xc‐govern‐center eureka: client: registerWithEureka: true fetchRegistry: true serviceUrl: defaultZone: ${EUREKA_SERVER:http://localhost:50101/eureka/} server: enable‐self‐preservation: false eviction‐interval‐timer‐in‐ms: 60000 instance: hostname: ${EUREKA_DOMAIN:eureka01}
通过设置JVM运行参数,完成多个注册中心实例的启动。
服务注册 依赖 在需要注册到注册中心的微服务中添加依赖,如:xc-service-manage-cms,其他微服务操作相同。
1 2 3 4 <dependency > <groupId > org.springframework.cloud</groupId > <artifactId > spring-cloud-starter-netflix-eureka-client</artifactId > </dependency >
启动类上新增注解 在启动类上新增@EnableDiscoveryClient注解。
application.yml新增配置 1 2 3 4 5 6 7 8 9 10 eureka: client: registerWithEureka: true fetchRegistry: true serviceUrl: defaultZone: ${EUREKA_SERVER:http://localhost:50101/eureka/,http://localhost:50102/eureka/} instance: prefer‐ip‐address: true ip‐address: ${IP_ADDRESS:127.0.0.1} instance‐id: ${spring.application.name}:${server.port}
课程详情静态化 课程数据查询 响应结果 1 2 3 4 5 6 7 8 9 10 11 12 13 14 15 16 17 18 19 20 21 22 package com.xuecheng.framework.domain.course.ext;import com.xuecheng.framework.domain.course.CourseBase;import com.xuecheng.framework.domain.course.CourseMarket;import com.xuecheng.framework.domain.course.CoursePic;import lombok.Data;import lombok.NoArgsConstructor;import lombok.ToString;@Data @ToString @NoArgsConstructor public class CourseView private CourseBase courseBase; private CourseMarket courseMarket; private CoursePic coursePic; private TeachplanNode teachplanNode; }
CourseViewControllerApi 1 2 3 4 5 6 7 8 9 10 11 12 13 package com.xuecheng.api.course;import com.xuecheng.framework.domain.course.ext.CourseView;import io.swagger.annotations.Api;import io.swagger.annotations.ApiOperation;@Api (value = "课程预览" , description = "课程预览接口,提供课程预览数据的查询" )public interface CourseViewControllerApi @ApiOperation ("课程视图查询" ) CourseView courseview (String id) ; }
CourseViewController 1 2 3 4 5 6 7 8 9 10 11 12 13 14 15 16 17 18 19 20 21 22 23 24 25 26 27 28 29 30 31 32 package com.xuecheng.manage_course.controller;import com.xuecheng.api.course.CourseViewControllerApi;import com.xuecheng.framework.domain.course.ext.CourseView;import com.xuecheng.framework.web.BaseController;import com.xuecheng.manage_course.service.CourseService;import org.springframework.beans.factory.annotation.Autowired;import org.springframework.web.bind.annotation.GetMapping;import org.springframework.web.bind.annotation.PathVariable;import org.springframework.web.bind.annotation.RequestMapping;import org.springframework.web.bind.annotation.RestController;@RestController @RequestMapping ("courseview" )public class CourseViewController extends BaseController implements CourseViewControllerApi @Autowired private CourseService courseService; @Override @GetMapping ("{id}" ) public CourseView courseview (@PathVariable String id) return courseService.getCourseView(id); } }
CourseService 1 2 3 4 5 6 7 8 9 10 11 12 13 14 15 16 17 18 19 20 21 22 23 24 25 26 27 28 29 30 31 32 33 34 35 36 37 38 39 40 41 42 43 44 45 46 47 48 49 50 51 52 53 54 55 56 57 58 59 60 61 62 package com.xuecheng.manage_course.service;import com.xuecheng.framework.domain.course.CourseBase;import com.xuecheng.framework.domain.course.CourseMarket;import com.xuecheng.framework.domain.course.CoursePic;import com.xuecheng.framework.domain.course.ext.CourseView;import com.xuecheng.framework.domain.course.ext.TeachplanNode;import com.xuecheng.framework.service.BaseService;import com.xuecheng.manage_course.dao.*;import lombok.extern.slf4j.Slf4j;import org.springframework.beans.factory.annotation.Autowired;import org.springframework.stereotype.Service;import java.util.Optional;@Slf 4j@Service public class CourseService extends BaseService @Autowired private CourseBaseRepository courseBaseRepository; @Autowired private CoursePicRepository coursePicRepository; @Autowired private CoursePlanMapper coursePlanMapper; @Autowired private CoursePlanRepository coursePlanRepository; @Autowired private CourseMarketRepository courseMarketRepository; public CourseView getCourseView (String id) CourseView result = new CourseView(); Optional<CourseBase> courseBaseOptional = courseBaseRepository.findById(id); courseBaseOptional.ifPresent(result::setCourseBase); Optional<CoursePic> coursePicOptional = coursePicRepository.findById(id); coursePicOptional.ifPresent(result::setCoursePic); Optional<CourseMarket> courseMarketOptional = courseMarketRepository.findById(id); courseMarketOptional.ifPresent(result::setCourseMarket); TeachplanNode teachplanNode = coursePlanMapper.findList(id); result.setTeachplanNode(teachplanNode); return result; } }
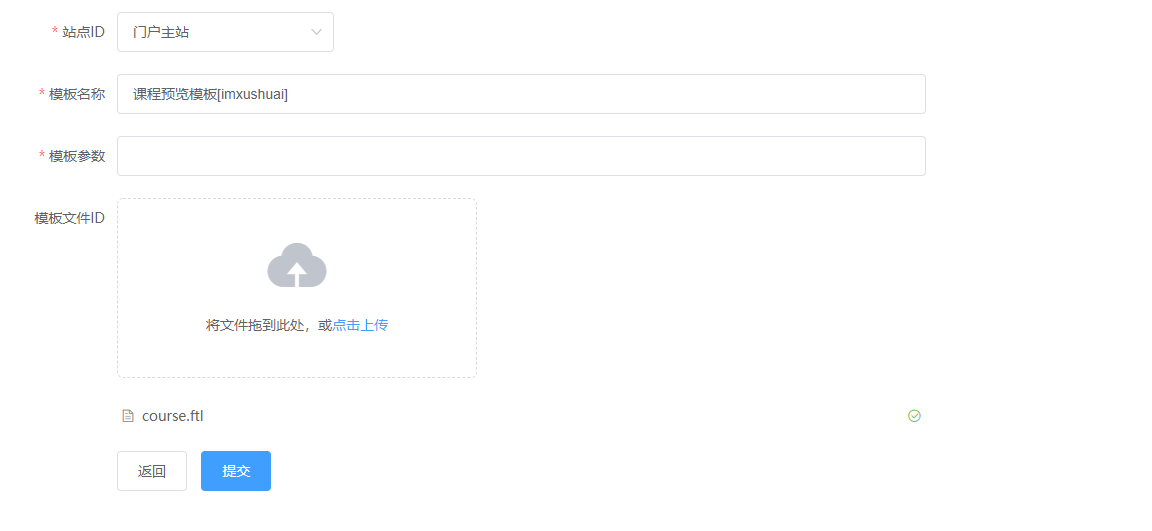
课程页面模板 新增课程页面模板(模板文件在资料里面提供的有)。
课程预览实现 需求分析
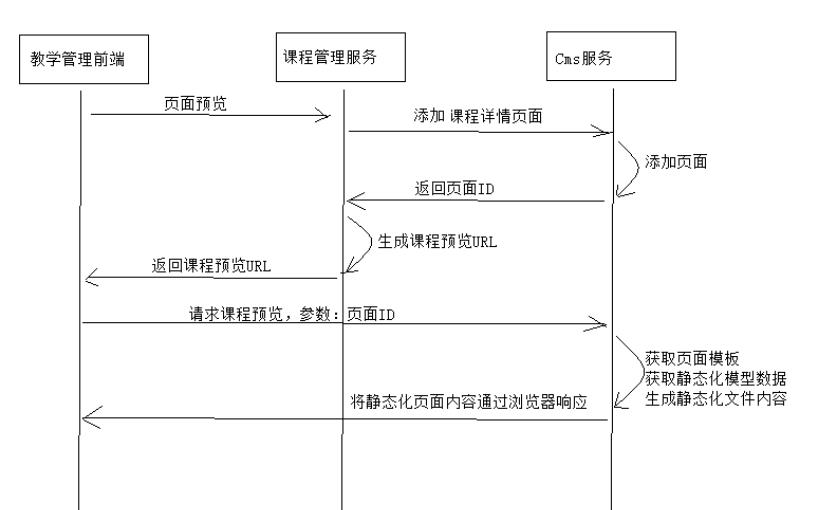
用户进入课程管理页面,点击课程预览,请求到课程管理服务。
课程管理服务远程调用cms添加页面接口向cms添加课程详情页面。
课程管理服务得到cms返回课程详情页面id,并拼接生成课程预览Url。
课程管理服务将课程预览Url给前端返回。
用户在前端页面请求课程预览Url,打开新窗口显示课程详情内容。
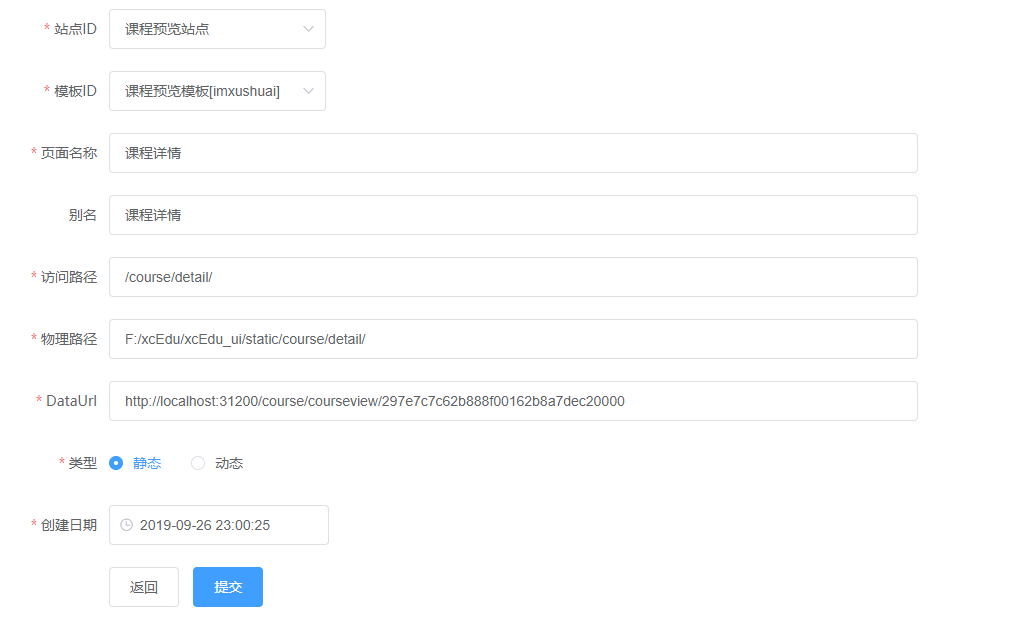
CMS页面预览测试 我这里使用CMS管理页面手动添加了一个页面
在页面预览Controller中新增代码,设置响应头信息
1 response.setHeader("Content-type" ,"text/html;charset=utf-8" );
点击页面预览即可。
CMS添加课程页面 功能说明:提供API,当课程前端点击页面预览时先添加课程详情页面。
CmsPageControllerApi 新增API接口
1 2 @ApiOperation ("保存页面" )CmsPageResult save (CmsPage cmsPage) ;
CmsPageController 新增接口实现
1 2 3 4 5 6 7 8 9 @Override @PostMapping ("save" ) public CmsPageResult save (@RequestBody CmsPage cmsPage) CmsPage save = cmsPageService.save(cmsPage); if (save == null ) { ExceptionCast.cast(CommonCode.FAIL); } return new CmsPageResult(CommonCode.SUCCESS, save); }
CmsPageService 新增保存方法
1 2 3 4 5 6 7 8 9 10 11 12 13 14 public CmsPage save (CmsPage cmsPage) CmsPage _cmsPage = cmsPageRepository .findBySiteIdAndPageNameAndPageWebPath(cmsPage.getSiteId(), cmsPage.getPageName(), cmsPage.getPageWebPath()); if (_cmsPage == null ) { cmsPage = add(cmsPage); } else { cmsPage.setPageId(_cmsPage.getPageId()); cmsPage = edit(cmsPage); } return cmsPage; }
课程预览调用 编写Feign Client 1 2 3 4 5 6 7 8 9 10 11 12 13 14 15 16 17 18 19 package com.xuecheng.manage_course.client;import com.xuecheng.framework.client.XcServiceList;import com.xuecheng.framework.domain.cms.CmsPage;import com.xuecheng.framework.domain.cms.response.CmsPageResult;import org.springframework.cloud.openfeign.FeignClient;import org.springframework.web.bind.annotation.PostMapping;import org.springframework.web.bind.annotation.RequestBody;@FeignClient (value = XcServiceList.XC_SERVICE_MANAGE_CMS)public interface CmsPageClient @PostMapping ("cms/page/save" ) CmsPageResult save (@RequestBody CmsPage cmsPage) ; }
响应结果实体类 1 2 3 4 5 6 7 8 9 10 11 12 13 14 15 16 17 18 19 package com.xuecheng.framework.domain.course.response;import com.xuecheng.framework.model.response.ResponseResult;import com.xuecheng.framework.model.response.ResultCode;import lombok.Data;import lombok.NoArgsConstructor;import lombok.ToString;@Data @ToString @NoArgsConstructor public class CoursePublishResult extends ResponseResult private String previewUrl; public CoursePublishResult (ResultCode resultCode, String previewUrl) super (resultCode); this .previewUrl = previewUrl; } }
新增配置 主要为Cms Page相关参数
1 2 3 4 5 6 7 course‐publish: siteId: 5 d8cd1d35f31573b5c6e4f11 templateId: 5 d8ccd635f31573b5c6e4f0e previewUrl: http://www.xuecheng.com/cms/preview/ pageWebPath: /course/detail/ pagePhysicalPath: F:/xcEdu/xcEdu_ui/static/course/detail/ dataUrlPre: http://localhost:31200/course/courseview/
Cms Page配置类 主要用于读取Cms Page相关参数
1 2 3 4 5 6 7 8 9 10 11 12 13 14 15 16 17 package com.xuecheng.manage_course.config;import lombok.Data;import org.springframework.boot.context.properties.ConfigurationProperties;import org.springframework.stereotype.Component;@Data @Component @ConfigurationProperties (prefix = "course-publish" )public class CoursePublishConfig private String siteId; private String templateId; private String previewUrl; private String pageWebPath; private String pagePhysicalPath; private String dataUrlPre; }
CourseViewControllerApi 1 2 @ApiOperation ("课程视图预览" )CoursePublishResult coursePreview (String id) ;
CourseViewController 1 2 3 4 5 6 7 8 9 10 11 12 13 14 15 @Override @PostMapping ("courseview/preview/{id}" )public CoursePublishResult coursePreview (@PathVariable String id) String preview = courseService.preview(id); if (StringUtils.isBlank(preview)) { return new CoursePublishResult(CommonCode.FAIL, null ); } return new CoursePublishResult(CommonCode.SUCCESS, preview); }
CourseService 1 2 3 4 5 6 7 8 9 10 11 12 13 14 15 16 17 18 19 20 21 22 23 24 25 26 27 28 29 30 31 32 33 @Autowired private CoursePublishConfig coursePublishConfig; public String preview (String id) Optional<CourseBase> courseBaseOptional = courseBaseRepository.findById(id); if (!courseBaseOptional.isPresent()) { ExceptionCast.cast(CourseCode.COURSE_NOT_EXIST); } CourseBase courseBase = courseBaseOptional.get(); CmsPage cmsPage = new CmsPage(); cmsPage.setSiteId(coursePublishConfig.getSiteId()); cmsPage.setTemplateId(coursePublishConfig.getTemplateId()); cmsPage.setPageAliase(courseBase.getName()); cmsPage.setPageName(courseBase.getId() + ".html" ); cmsPage.setPageWebPath(coursePublishConfig.getPageWebPath()); cmsPage.setPagePhysicalPath(coursePublishConfig.getPagePhysicalPath()); cmsPage.setDataUrl(coursePublishConfig.getDataUrlPre() + courseBase.getId()); CmsPageResult save = cmsPageClient.save(cmsPage); if (save.isSuccess()) { return coursePublishConfig.getPreviewUrl() + save.getCmsPage().getPageId(); } return null ; }
前端修改 我这里的课程预览API链接事:course/courseview/preview/{id}。
前端调用的确实:course/preview/{id}
所以这里我需要修改一下前端API接口地址就OK了,其他内容基本上全部是正常的。
排坑 我调用CmsPageClient时报错。
1 2 Type definition error: [simple type, class com.xuecheng.framework.domain.cms.response.CmsPageResult]; nested exception is com.fasterxml.jackson.databind.exc.InvalidDefinitionException: Cannot construct instance of `com.xuecheng.framework.domain.cms.response.CmsPageResult`, problem: null at [Source: (PushbackInputStream); line: 1 , column: 558 ]
因为这里我之前编写CmsPageResult实体类,忘记添加无参构造了,所以这里Spring反序列化对象的时候出错了。
解决:
在CmsPageResult的类上添加@NoArgsConstructor或者手写一个无参构造函数即可。
课程发布实现 课程发布后将生成正式的课程详情页面,课程发布后用户即可浏览课程详情页面,并开始课程的学习。
需求分析
课程发布生成课程详情页面的流程与课程预览业务流程相同,如下:
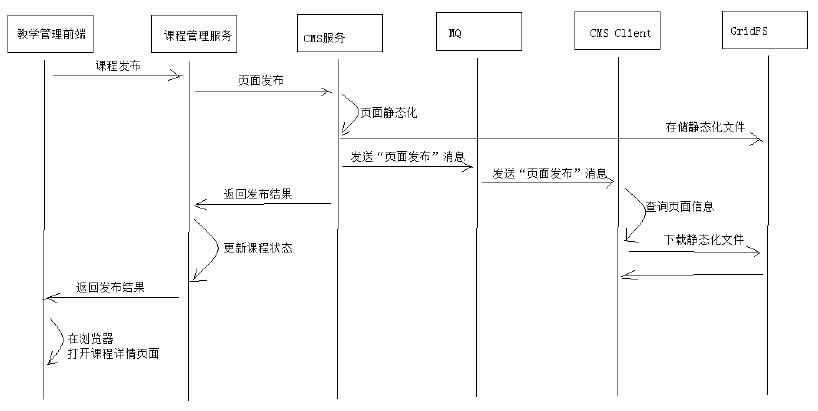
用户进入教学管理中心,进入某个课程的管理界面。
点击课程发布,前端请求到课程管理服务。
课程管理服务远程调用CMS生成课程发布页面,CMS将课程详情页面发布到服务器。
课程管理服务修改课程发布状态为“已发布”,并向前端返回发布成功。
用户在教学管理中心点击“课程详情页面”链接,查看课程详情页面内容。
CMS课程发布接口 响应结果实体类 1 2 3 4 5 6 7 8 9 10 11 12 13 14 15 16 17 package com.xuecheng.framework.domain.cms.response;import com.xuecheng.framework.model.response.ResponseResult;import com.xuecheng.framework.model.response.ResultCode;import lombok.Data;import lombok.NoArgsConstructor;@Data @NoArgsConstructor public class CmsPostPageResult extends ResponseResult private String pageUrl; public CmsPostPageResult (ResultCode resultCode, String pageUrl) super (resultCode); this .pageUrl = pageUrl; } }
CmsPageControllerApi 新增接口定义
1 2 @ApiOperation ("页面一键发布" )CmsPostPageResult postPageQuick (CmsPage cmsPage) ;
CmsPageController 新增接口实现
1 2 3 4 5 6 7 8 9 10 11 12 13 14 15 @Override @PostMapping ("postPageQuick" )public CmsPostPageResult postPageQuick (@RequestBody CmsPage cmsPage) String url = cmsPageService.postPageQuick(cmsPage); if (StringUtils.isBlank(url)) { ExceptionCast.cast(CommonCode.FAIL); } return new CmsPostPageResult(CommonCode.SUCCESS, url); }
CmsPageService 1 2 3 4 5 6 7 8 9 10 11 12 13 14 15 16 17 18 19 20 21 22 23 24 25 26 27 28 29 30 31 32 33 34 35 36 37 public String postPageQuick (CmsPage cmsPage) CmsPage save = save(cmsPage); isNullOrEmpty(save, CommonCode.FAIL); ResponseResult postPage = postPage(save.getPageId()); if (!postPage.isSuccess()) { ExceptionCast.cast(CommonCode.FAIL); } StringBuffer buffer = new StringBuffer(); Optional<CmsSite> cmsSiteOptional = cmsSiteRepository.findById(save.getSiteId()); CmsSite cmsSite = cmsSiteOptional.orElse(null ); isNullOrEmpty(cmsSite, CommonCode.FAIL); assert cmsSite != null ; String siteDomain = cmsSite.getSiteDomain(); String siteWebPath = cmsSite.getSiteWebPath(); String pageWebPath = cmsPage.getPageWebPath(); String pageName = cmsPage.getPageName(); return buffer .append(siteDomain) .append(siteWebPath) .append(pageWebPath) .append(pageName) .toString(); }
课程发布接口 Feign Client 新增远程调用的方法定义
1 2 3 4 5 6 7 8 @PostMapping ("cms/page/postPageQuick" )CmsPostPageResult postPageQuick (@RequestBody CmsPage cmsPage) ;
CourseViewControllerApi 新增接口定义
1 2 @ApiOperation ("课程发布" )CoursePublishResult coursePublish (String id) ;
CourseViewController 新增接口实现
1 2 3 4 5 6 7 8 9 10 11 12 13 @Override @PostMapping ("publish/{id}" )public CoursePublishResult coursePublish (@PathVariable String id) String publishUrl = courseService.publish(id); isNullOrEmpty(publishUrl, CommonCode.FAIL); return new CoursePublishResult(CommonCode.SUCCESS, publishUrl); }
CourseService 新增方法
1 2 3 4 5 6 7 8 9 10 11 12 13 14 15 16 17 18 19 20 21 22 23 24 25 26 27 28 29 30 31 32 33 34 35 36 37 38 39 40 41 42 43 44 45 46 47 48 49 50 51 52 53 54 55 56 57 58 59 60 61 62 63 64 65 66 67 68 69 70 @Autowired private CourseBaseService courseBaseService; @Transactional public String publish (String id) CmsPage cmsPage = buildCmsPage(id); CmsPostPageResult cmsPostPageResult = cmsPageClient.postPageQuick(cmsPage); if (!cmsPostPageResult.isSuccess()) { ExceptionCast.cast(CourseCode.COURSE_PUBLISH_VIEWERROR); } saveCoursePubState(id, "202002" ); return cmsPostPageResult.getPageUrl(); } private CourseBase saveCoursePubState (String courseId, String status) CourseBase courseBase = courseBaseService.findById(courseId); courseBase.setStatus(status); return courseBaseRepository.save(courseBase); } private CmsPage buildCmsPage (String id) Optional<CourseBase> courseBaseOptional = courseBaseRepository.findById(id); if (!courseBaseOptional.isPresent()) { ExceptionCast.cast(CourseCode.COURSE_NOT_EXIST); } CourseBase courseBase = courseBaseOptional.get(); CmsPage cmsPage = new CmsPage(); cmsPage.setSiteId(coursePublishConfig.getSiteId()); cmsPage.setTemplateId(coursePublishConfig.getTemplateId()); cmsPage.setPageAliase(courseBase.getName()); cmsPage.setPageName(courseBase.getId() + ".html" ); cmsPage.setPageWebPath(coursePublishConfig.getPageWebPath()); cmsPage.setPagePhysicalPath(coursePublishConfig.getPagePhysicalPath()); cmsPage.setDataUrl(coursePublishConfig.getDataUrlPre() + courseBase.getId()); return cmsPage; }
这里由于预览和发布的时候构造Cms Page的内容是一致的,所以我这里抽取了一下代码。
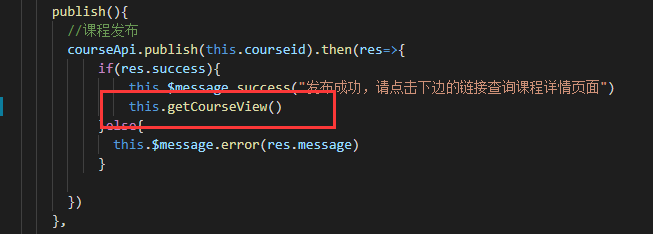
前端 修改course_pub.vue中的publish方法,完成调用后查询一下最新数据就OK了。
代码获取 代码获取


