十次方人工智能笔记一:网络爬虫
完成十次方网络爬虫

爬虫框架WebMagic

架构解析

WebMagic的设计目标是尽量的模块化,并体现爬虫的功能特点。这部分提供非常简单、灵活的API,在基本不改变开发模式的情况下,编写一个爬虫。

WebMagic的结构分为DownloaderPageProcessorSchedulerPipeline四大组件,并由Spider将它们彼此组织起来。这四大组件对应爬虫生命周期中的下载、处理、管理和持久化等功能。而Spider则将这几个组件组织起来,让它们可以互相交互,流程化的执行,可以认为Spider是一个大的容器,它也是WebMagic逻辑的核心。
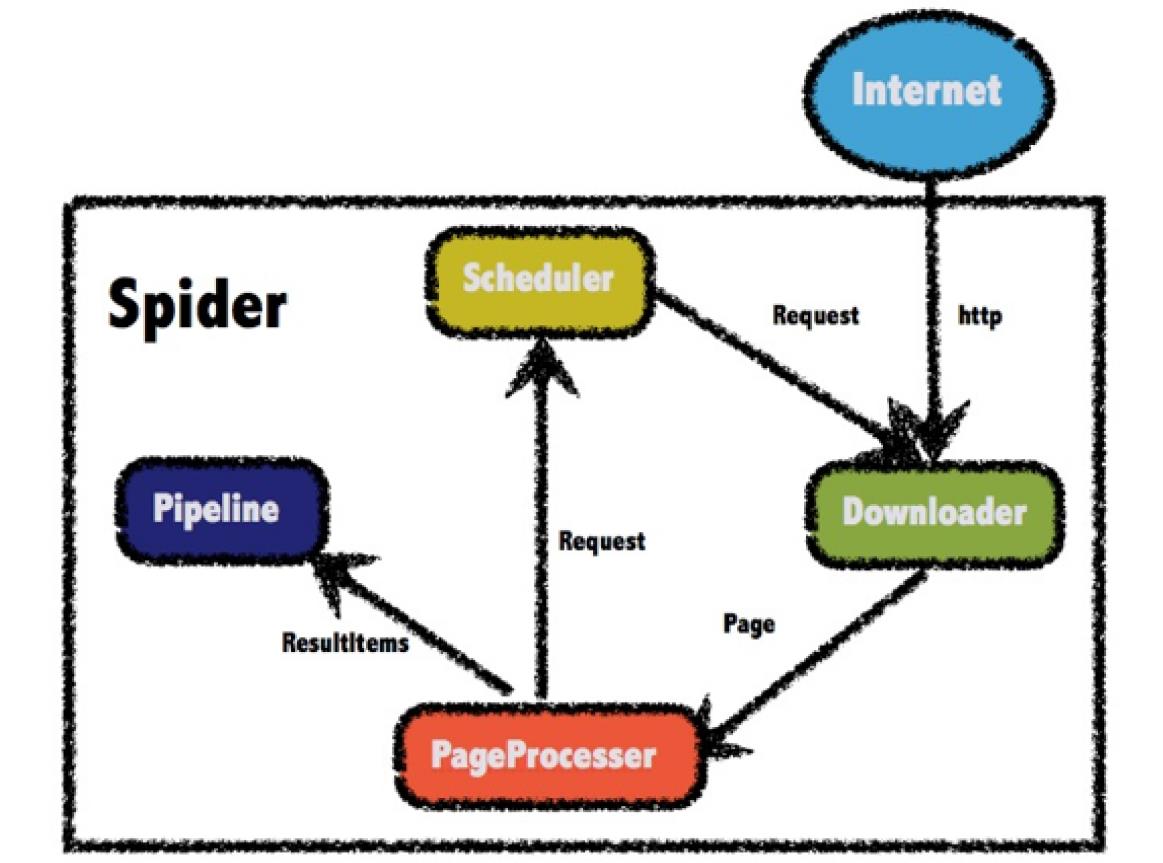
WenMagic组件:

  • Downloader

    Downloader负责从互联网上下载页面,以便后续处理。WebMagic默认使用了ApacheHttpClient作为下载工具。

  • PageProcesser

    PageProcessor负责解析页面,抽取有用信息,以及发现新的链接。WebMagic使用Jsoup作为HTML解析工具,并基于其开发了解析XPath的工具Xsoup

    在这四个组件中,PageProcessor对于每个站点每个页面都不一样,是需要使用者定制的部分。

  • Scheduler

    Scheduler负责管理待抓取的URL,以及一些去重的工作。WebMagic默认提供了JDK的内存队列来管理URL,并用集合来进行去重。也支持使用Redis进行分布式管理。

  • Pipeline

    Pipeline负责抽取结果的处理,包括计算、持久化到文件、数据库等。WebMagic默认提供了“输出到控制台”和“保存到文件”两种结果处理方案。

API

Spider API

方法 说明 示例
create(PageProcessor) 创建Spider Spider.create(new GithubRepoProcessor())
addUrl(String…) 添加初始的URL Spider.addUrl(“http://webmagic.io/docs/")
thread(n) 开启n个线程 Spider.thread(5)
run() 启动,会阻塞当前线程执行 Spider.run()
start()/runAsync() 异步启动,当前线程继续执行 Spider.start()
stop() 停止爬虫 Spider.stop()
addPipeline(Pipeline) 添加一个Pipeline,一个Spider可以有多个Pipeline Spider .addPipeline(new ConsolePipeline())
setScheduler(Scheduler) 设置Scheduler,一个Spider只能有一个Scheduler Spider.setScheduler(new RedisScheduler())
setDownloader(Downloader) 设置Downloader,一个Spider只能有一个Downloader Spider.setDownloader(new SeleniumDownloader())
get(String) 同步调用,并直接取得结果 ResultItems result = Spider.get(“http://webmagic.io/docs/")
getAll(String…) 同步调用,并直接取得一堆结果 List results = Spider.getAll(“http://webmagic.io/docs/","http://webmagic.io/xxx")

同时Spider的其他组件(Downloader、Scheduler、Pipeline)都可以通过set方法来进行设置。

Site API

方法 说明 示例
setCharset(String) 设置编码 site.setCharset(“utf-8”)
setUserAgent(String) 设置UserAgent site.setUserAgent(“Spider”)
setTimeOut(int) 设置超时时间, 单位是毫秒 site.setTimeOut(3000)
setRetryTimes(int) 设置重试次数 site.setRetryTimes(3)
setCycleRetryTimes(int) 设置循环重试次数 site.setCycleRetryTimes(3)
addCookie(String,String) 添加一条cookie site.addCookie(“dotcomt_user”,”code4craft”)
setDomain(String) 设置域名,需设置域名后,addCookie才可生效 site.setDomain(“github.com”)
addHeader(String,String) 添加一条addHeader site.addHeader(“Referer”,”https://github.com")
setHttpProxy(HttpHost) 设置Http代理 site.setHttpProxy(new HttpHost(“127.0.0.1”,8080))
setSleepTime 间隔时间设置 site.setSleepTime(100)

PageProcessor

爬取页面全部内容

需求:编写爬虫程序,爬取csdn中博客的内容 https://blog.csdn.net/

  1. 创建工程,引入依赖

    1
    2
    3
    4
    5
    6
    7
    8
    9
    10
    11
    12
    13
    14
    15
    16
    17
    18
    19
    20
    21
    22
    23
    24
    <?xml version="1.0" encoding="UTF-8"?>
    <project xmlns="http://maven.apache.org/POM/4.0.0"
    xmlns:xsi="http://www.w3.org/2001/XMLSchema-instance"
    xsi:schemaLocation="http://maven.apache.org/POM/4.0.0 http://maven.apache.org/xsd/maven-4.0.0.xsd">
    <modelVersion>4.0.0</modelVersion>

    <groupId>com.xushuai</groupId>
    <artifactId>webmagic_demo</artifactId>
    <version>1.0-SNAPSHOT</version>


    <dependencies>
    <dependency>
    <groupId>us.codecraft</groupId>
    <artifactId>webmagic-core</artifactId>
    <version>0.7.3</version>
    </dependency>
    <dependency>
    <groupId>us.codecraft</groupId>
    <artifactId>webmagic-extension</artifactId>
    <version>0.7.3</version>
    </dependency>
    </dependencies>
    </project>
  2. 实现页面爬取

    1
    2
    3
    4
    5
    6
    7
    8
    9
    10
    11
    12
    13
    14
    15
    16
    17
    18
    19
    20
    21
    22
    23
    24
    25
    26
    27
    28
    29
    package com.xushuai.magic.spider;

    import us.codecraft.webmagic.Page;
    import us.codecraft.webmagic.Site;
    import us.codecraft.webmagic.Spider;
    import us.codecraft.webmagic.pipeline.ConsolePipeline;
    import us.codecraft.webmagic.processor.PageProcessor;

    /**
    * Spider Class Demo
    */
    public class PageProcessorDemo1 implements PageProcessor {


    public void process(Page page) {
    System.out.println(page.getHtml().toString());
    }

    public Site getSite() {
    return Site.me().setSleepTime(100).setRetryTimes(3);
    }

    public static void main(String[] args) {
    Spider.create(new PageProcessorDemo1())
    // 添加爬取的主网站
    .addUrl("https://www.csdn.net/")
    .run();
    }
    }

Page代表了从Downloader下载到的一个页面——可能是HTML,也可能是JSON或者 其他文本格式的内容。Page是WebMagic抽取过程的核心对象,它提供一些方法可供抽取、结果保存等。

Site用于定义站点本身的一些配置信息,例如编码、HTTP头、超时时间、重试策略等、代理等,都可以通过设置Site对象来进行配置。

爬取指定内容

使用xpath来抓去网页指定部分内容

1
page.getHtml().xpath("//*[@id=\"nav\"]/div/div/ul/li[5]/a");

添加目标地址

添加目标地址,将目标地址中所有的链接添加到待爬取列表

1
page.addTargetRequests(page.getHtml().links().all());

目标地址正则匹配

需求:只提取博客的文章详细页内容,并提取标题

1
2
page.addTargetRequests(page.getHtml()
.links().regex("https://blog.csdn.net/[a-z 0-9-]+/article/details/[0-9]{8}").all());

Pipeline

ConsolePipeline 控制台输出(省略)

FilePipeline 文件输出

1
2
3
4
5
6
7
8
9
10
public static void main(String[] args) {
Spider.create(new PageProcessorDemo1())
// 添加爬取的主网站
.addUrl("https://www.csdn.net/")
// 添加控制台输出管道
.addPipeline(new ConsolePipeline())
// 添加文件输出管道
.addPipeline(new FilePipeline("F:/data"))
.run();
}

JsonFilePipeline Json输出

1
2
3
4
5
6
7
8
9
10
11
12
public static void main(String[] args) {
Spider.create(new PageProcessorDemo1())
// 添加爬取的主网站
.addUrl("https://www.csdn.net/")
// 添加控制台输出管道
.addPipeline(new ConsolePipeline())
// 添加文件输出管道
.addPipeline(new FilePipeline("F:/data"))
// 添加Json输出管道
.addPipeline(new JsonFilePipeline("F:/json"))
.run();
}

Custom Pipeline 自定义输出

  • 编写自定义管道类

    1
    2
    3
    4
    5
    6
    7
    8
    9
    10
    11
    12
    13
    14
    package com.xushuai.magic.pipeline;

    import us.codecraft.webmagic.ResultItems;
    import us.codecraft.webmagic.Task;
    import us.codecraft.webmagic.pipeline.Pipeline;

    /**
    * 自定义输出管道
    */
    public class CustomPipeline implements Pipeline {
    public void process(ResultItems resultItems, Task task) {
    System.out.println(resultItems.get("title"));
    }
    }
  • 添加自定义管道

    1
    2
    3
    4
    5
    6
    7
    8
    9
    10
    11
    12
    13
    14
    public static void main(String[] args) {
    Spider.create(new PageProcessorDemo1())
    // 添加爬取的主网站
    .addUrl("https://www.csdn.net/")
    // 添加控制台输出管道
    .addPipeline(new ConsolePipeline())
    // 添加文件输出管道
    .addPipeline(new FilePipeline("F:/data"))
    // 添加Json输出管道
    .addPipeline(new JsonFilePipeline("F:/json"))
    // 添加自定义管道
    .addPipeline(new CustomPipeline())
    .run();
    }

Scheduler

Scheduler(URL管理) 最基本的功能是实现对已经爬取的URL进行标示。可以实现URL的增量去重。

目前Scheduler主要有三种实现方式:

  • 内存队列:QueueScheduler
  • 文件队列:FileCacheQueueScheduler
  • Redis队列:RedisScheduler

内存队列

1
2
3
4
5
6
7
8
public static void main(String[] args) {
Spider.create(new PageProcessorDemo1())
// 添加爬取的主网站
.addUrl("https://www.csdn.net/")
// 添加内存队列
.setScheduler(new QueueScheduler())
.run();
}

文件队列

使用文件保存抓取URL,可以在关闭程序并下次启动时,从之前抓取到的URL继续抓取。

1
2
3
4
5
6
7
8
public static void main(String[] args) {
Spider.create(new PageProcessorDemo1())
// 添加爬取的主网站
.addUrl("https://www.csdn.net/")
// 添加文件队列
.setScheduler(new FileCacheQueueScheduler("F:/scheduler"))
.run();
}

Redis队列

使用Redis保存抓取队列,可进行多台机器同时合作抓取。

1
2
3
4
5
6
7
8
public static void main(String[] args) {
Spider.create(new PageProcessorDemo1())
// 添加爬取的主网站
.addUrl("https://www.csdn.net/")
// 添加Redis队列
.setScheduler(new RedisScheduler("192.168.136.104"))
.run();
}

十次方文章数据爬取

需求:每日某时间段从CSDN播客中爬取文档,存入文章数据库中。

准备工作

  1. CSDN中各个频道的地址

    | 频道名称 | 地址 |
    | ——– | ———————————— |
    | 资讯 | https://blog.csdn.net/nav/news |
    | 人工智能 | https://blog.csdn.net/nav/ai |
    | 区块链 | https://blog.csdn.net/nav/blockchain |
    | 数据库 | https://blog.csdn.net/nav/db |
    | 前端 | https://blog.csdn.net/nav/web |
    | 编程语言 | https://blog.csdn.net/nav/lang |

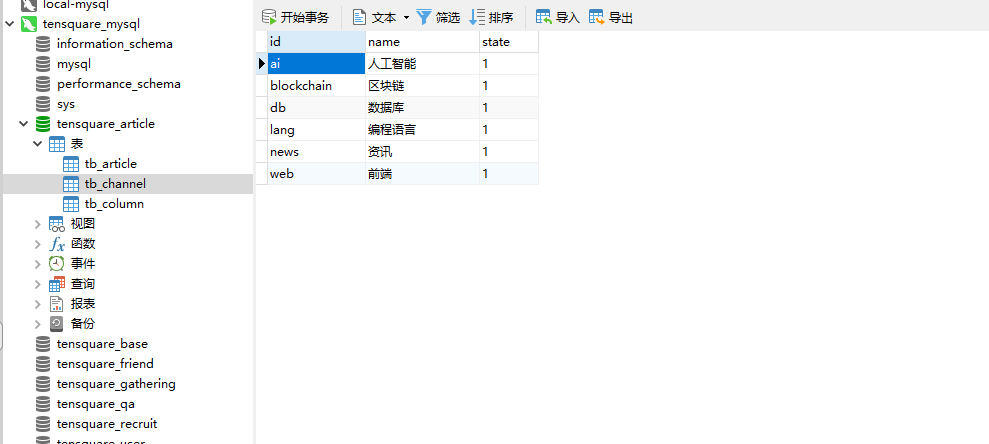
  2. 向数据库tensquare_article中的tb_channel表中添加记录

文章爬取微服务

创建Module

  1. pom.xml

    1
    2
    3
    4
    5
    6
    7
    8
    9
    10
    11
    12
    13
    14
    15
    16
    17
    18
    19
    20
    21
    22
    23
    24
    25
    26
    27
    28
    29
    30
    31
    32
    33
    34
    35
    36
    37
    38
    39
    40
    41
    42
    43
    44
    45
    46
    <?xml version="1.0" encoding="UTF-8"?>
    <project xmlns="http://maven.apache.org/POM/4.0.0"
    xmlns:xsi="http://www.w3.org/2001/XMLSchema-instance"
    xsi:schemaLocation="http://maven.apache.org/POM/4.0.0 http://maven.apache.org/xsd/maven-4.0.0.xsd">
    <parent>
    <artifactId>tensquare_parent</artifactId>
    <groupId>com.tensquare</groupId>
    <version>1.0.0-SNAPSHOT</version>
    </parent>
    <modelVersion>4.0.0</modelVersion>

    <artifactId>tensquare_article_crawler</artifactId>

    <dependencies>
    <dependency>
    <groupId>us.codecraft</groupId>
    <artifactId>webmagic-core</artifactId>
    <version>0.7.3</version>
    <exclusions>
    <exclusion>
    <groupId>org.slf4j</groupId>
    <artifactId>slf4j-log4j12</artifactId>
    </exclusion>
    </exclusions>
    </dependency>
    <dependency>
    <groupId>us.codecraft</groupId>
    <artifactId>webmagic-extension</artifactId>
    <version>0.7.3</version>
    </dependency>
    <dependency>
    <groupId>org.springframework.boot</groupId>
    <artifactId>spring-boot-starter-data-jpa</artifactId>
    </dependency>
    <dependency>
    <groupId>mysql</groupId>
    <artifactId>mysql-connector-java</artifactId>
    </dependency>
    <dependency>
    <groupId>com.tensquare</groupId>
    <artifactId>tensquare_common</artifactId>
    <version>${tensquare.version}</version>
    </dependency>

    </dependencies>
    </project>
  2. application.yml

    1
    2
    3
    4
    5
    6
    7
    8
    9
    10
    11
    12
    13
    14
    15
    server:
    port: 9014
    spring:
    application:
    name: tensquare-crawler
    datasource:
    driver-class-name: com.mysql.jdbc.Driver
    url: jdbc:mysql://192.168.136.104:3306/tensquare_article?characterEncoding=UTF8
    username: root
    password: 123456
    jpa:
    database: mysql
    show-sql: true
    redis:
    host: 192.168.136.104
  3. 启动类

    1
    2
    3
    4
    5
    6
    7
    8
    9
    10
    11
    12
    13
    14
    15
    16
    17
    18
    19
    20
    21
    22
    23
    24
    25
    26
    27
    28
    29
    30
    31
    package com.tensquare.crawler;

    import org.springframework.beans.factory.annotation.Value;
    import org.springframework.boot.SpringApplication;
    import org.springframework.boot.autoconfigure.SpringBootApplication;
    import org.springframework.context.annotation.Bean;
    import org.springframework.scheduling.annotation.EnableScheduling;
    import us.codecraft.webmagic.scheduler.RedisScheduler;
    import util.IdWorker;

    @EnableScheduling
    @SpringBootApplication
    public class CrawlerApplication {

    @Value("${spring.redis.host}")
    private String REDIS_HOST;

    public static void main(String[] args) {
    SpringApplication.run(CrawlerApplication.class, args);
    }

    @Bean
    public IdWorker idWorker() {
    return new IdWorker(1, 11);
    }

    @Bean
    public RedisScheduler redisScheduler() {
    return new RedisScheduler(REDIS_HOST);
    }
    }
  1. 复制文章实体类以及数据访问接口(省略)

爬取类(PageProcessor)

1
2
3
4
5
6
7
8
9
10
11
12
13
14
15
16
17
18
19
20
21
22
23
24
25
26
27
28
29
30
31
32
33
34
35
package com.tensquare.crawler.processor;

import org.apache.commons.lang3.StringUtils;
import org.springframework.stereotype.Component;
import us.codecraft.webmagic.Page;
import us.codecraft.webmagic.Site;
import us.codecraft.webmagic.processor.PageProcessor;

/**
* 文章爬取类
*/
@Component
public class ArticleProcessor implements PageProcessor {

@Override
public void process(Page page) {
// 添加爬取的页面
page.addTargetRequests(page.getHtml()
.links().regex("https://blog.csdn.net/[a-z 0-9-]+/article/details/[0-9]{8}").all());
// 获取标题以及内容
String title = page.getHtml().xpath("//*[@id=\"mainBox\"]/main/div[1]/div/div/div[1]/h1/text()").get();
String content = page.getHtml().xpath("//*[@id=\"article_content\"]").get();
if (StringUtils.isNotBlank(title) && StringUtils.isNotBlank(content)) {
page.putField("title", title);
page.putField("content", content);
} else {
page.setSkip(true);
}
}

@Override
public Site getSite() {
return Site.me().setRetryTimes(100).setSleepTime(100);
}
}

入库类(Pipeline)

1
2
3
4
5
6
7
8
9
10
11
12
13
14
15
16
17
18
19
20
21
22
23
24
25
26
27
28
29
30
31
32
33
34
35
36
37
38
39
40
41
package com.tensquare.crawler.pipeline;

import com.tensquare.crawler.dao.ArticleDao;
import com.tensquare.crawler.pojo.Article;
import org.springframework.beans.factory.annotation.Autowired;
import org.springframework.stereotype.Component;
import us.codecraft.webmagic.ResultItems;
import us.codecraft.webmagic.Task;
import us.codecraft.webmagic.pipeline.Pipeline;
import util.IdWorker;

@Component
public class ArticlePipeline implements Pipeline {

@Autowired
private ArticleDao articleDao;

@Autowired
private IdWorker idWorker;

private String channelId;

public void setChannelId(String channelId) {
this.channelId = channelId;
}

@Override
public void process(ResultItems resultItems, Task task) {
// 取出爬取类中的title和content
String title = resultItems.get("title");
String content = resultItems.get("content");
// 构造文章对象
Article article = new Article();
article.setChannelid(channelId);
article.setId(idWorker.nextId().toString());
article.setTitle(title);
article.setContent(content);
// 保存
articleDao.save(article);
}
}

任务(Task)

1
2
3
4
5
6
7
8
9
10
11
12
13
14
15
16
17
18
19
20
21
22
23
24
25
26
27
28
29
30
31
32
33
34
35
36
37
38
39
40
41
42
43
44
45
46
47
48
49
50
51
52
53
54
55
56
57
58
59
60
61
62
63
64
65
66
67
68
69
70
71
72
73
74
75
76
77
78
79
80
81
82
83
84
85
86
87
88
89
90
91
92
package com.tensquare.crawler.task;

import com.tensquare.crawler.pipeline.ArticlePipeline;
import com.tensquare.crawler.processor.ArticleProcessor;
import lombok.extern.slf4j.Slf4j;
import org.springframework.beans.factory.annotation.Autowired;
import org.springframework.scheduling.annotation.Scheduled;
import org.springframework.stereotype.Component;
import us.codecraft.webmagic.Spider;
import us.codecraft.webmagic.scheduler.RedisScheduler;

@Slf4j
@Component
public class ArticleCrawlerTask {

@Autowired
private ArticlePipeline articlePipeline;

@Autowired
private RedisScheduler redisScheduler;

@Autowired
private ArticleProcessor articleProcessor;

@Scheduled(cron = "0 0 0 * * *")
public void aiTask() {
log.info("开始爬取AI文章");
articlePipeline.setChannelId("ai");
Spider spider = Spider.create(articleProcessor);
spider.addUrl("https://blog.csdn.net/nav/ai/")
.addPipeline(articlePipeline)
.setScheduler(redisScheduler)
.start();
}

@Scheduled(cron = "0 0 1 * * *")
public void blockChainTask() {
log.info("开始爬取区块链文章");
articlePipeline.setChannelId("blockchain");
Spider spider = Spider.create(articleProcessor);
spider.addUrl("https://blog.csdn.net/nav/blockchain/")
.addPipeline(articlePipeline)
.setScheduler(redisScheduler)
.run();
}

@Scheduled(cron = "0 0 2 * * *")
public void dbTask() {
log.info("开始爬取区数据库文章");
articlePipeline.setChannelId("db");
Spider spider = Spider.create(articleProcessor);
spider.addUrl("https://blog.csdn.net/nav/db/")
.addPipeline(articlePipeline)
.setScheduler(redisScheduler)
.run();
}

@Scheduled(cron = "0 0 3 * * *")
public void langTask() {
log.info("开始爬取编程语言文章");
articlePipeline.setChannelId("lang");
Spider spider = Spider.create(articleProcessor);
spider.addUrl("https://blog.csdn.net/nav/lang/")
.addPipeline(articlePipeline)
.setScheduler(redisScheduler)
.run();
}

@Scheduled(cron = "0 0 4 * * *")
public void newsTask() {
log.info("开始爬取资讯文章");
articlePipeline.setChannelId("news");
Spider spider = Spider.create(articleProcessor);
spider.addUrl("https://blog.csdn.net/nav/news/")
.addPipeline(articlePipeline)
.setScheduler(redisScheduler)
.run();
}

@Scheduled(cron = "0 0 5 * * *")
public void webTask() {
log.info("开始爬取前端文章");
articlePipeline.setChannelId("web");
Spider spider = Spider.create(articleProcessor);
spider.addUrl("https://blog.csdn.net/nav/web/")
.addPipeline(articlePipeline)
.setScheduler(redisScheduler)
.run();
}


}

注意:addUrl(url)中添加的路径一定要以/结尾。

十次方用户数据爬取

从csdn中爬取用户昵称和头像,存到用户表,头像图片存储到本地。

用户爬取微服务

创建Module

  1. pom.xml(省略,与文章数据爬取微服务一致)

  2. application.yml

    1
    2
    3
    4
    5
    6
    7
    8
    9
    10
    11
    12
    13
    14
    15
    server:
    port: 9015
    spring:
    application:
    name: tensquare-user-crawler
    datasource:
    driver-class-name: com.mysql.jdbc.Driver
    url: jdbc:mysql://192.168.136.104:3306/tensquare_user?characterEncoding=UTF8
    username: root
    password: 123456
    jpa:
    database: mysql
    show-sql: true
    redis:
    host: 192.168.136.104
  3. 启动类

    1
    2
    3
    4
    5
    6
    7
    8
    9
    10
    11
    12
    13
    14
    15
    16
    17
    18
    19
    20
    21
    22
    23
    24
    25
    26
    27
    28
    29
    30
    31
    package com.tensquare.crawler;

    import org.springframework.beans.factory.annotation.Value;
    import org.springframework.boot.SpringApplication;
    import org.springframework.boot.autoconfigure.SpringBootApplication;
    import org.springframework.context.annotation.Bean;
    import org.springframework.scheduling.annotation.EnableScheduling;
    import us.codecraft.webmagic.scheduler.RedisScheduler;
    import util.IdWorker;

    @EnableScheduling
    @SpringBootApplication
    public class UserCrawlerApplication {

    @Value("${spring.redis.host}")
    private String REDIS_HOST;

    public static void main(String[] args) {
    SpringApplication.run(UserCrawlerApplication.class, args);
    }

    @Bean
    public IdWorker idWorker() {
    return new IdWorker(1, 11);
    }

    @Bean
    public RedisScheduler redisScheduler() {
    return new RedisScheduler(REDIS_HOST);
    }
    }
  4. 复制用户实体类以及数据访问接口(省略)

下载工具类

tensquare_common中添加下载工具类

1
2
3
4
5
6
7
8
9
10
11
12
13
14
15
16
17
18
19
20
21
22
23
24
25
26
27
28
29
30
31
32
33
34
35
36
37
38
39
40
41
42
43
44
45
46
47
48
package util;

import java.io.*;
import java.net.URL;
import java.net.URLConnection;

/**
* 下载工具类
*/
public class DownloadUtil {

/**
* 下载
*
* @param urlStr
* @param filename
* @param savePath
* @throws IOException
*/
public static void download(String urlStr, String filename, String
savePath) throws IOException {
URL url = new URL(urlStr);
//打开url连接
URLConnection connection = url.openConnection();
//请求超时时间
connection.setConnectTimeout(5000);
//输入流
InputStream in = connection.getInputStream();
//缓冲数据
byte[] bytes = new byte[1024];
//数据长度
int len;
//文件
File file = new File(savePath);
if (!file.exists())
file.mkdirs();
OutputStream out = new
FileOutputStream(file.getPath() + "\\" + filename);
//先读到bytes中
while ((len = in.read(bytes)) != -1){
//再从bytes中写入文件
out.write(bytes, 0, len);
}
//关闭IO
out.close();
in.close();
}
}

爬取类(PageProcessor)

1
2
3
4
5
6
7
8
9
10
11
12
13
14
15
16
17
18
19
20
21
22
23
24
25
26
27
28
29
30
31
32
33
package com.tensquare.crawler.processor;

import org.apache.commons.lang3.StringUtils;
import org.springframework.stereotype.Component;
import us.codecraft.webmagic.Page;
import us.codecraft.webmagic.Site;
import us.codecraft.webmagic.processor.PageProcessor;

@Component
public class UserProcessor implements PageProcessor {

@Override
public void process(Page page) {
// 添加爬取的页面
page.addTargetRequests(page.getHtml().links().regex("https://blog.csdn.net/[a-z 0-9-]+/article/details/[0-9]{8}").all());
// 昵称和头像
String nickname = page.getHtml().xpath("//*[@id=\"uid\"]/text()").get();
String image = page.getHtml().xpath("//*[@id=\"asideProfile\"]/div[1]/div[1]/a/img[1]").get();
// 保存
if (StringUtils.isNotBlank(nickname) && StringUtils.isNotBlank(image)) {
page.putField("nickname", nickname);
page.putField("image", image);
} else {
page.setSkip(true);
}

}

@Override
public Site getSite() {
return Site.me().setRetryTimes(3000).setSleepTime(100);
}
}

入库类(Pipeline)

1
2
3
4
5
6
7
8
9
10
11
12
13
14
15
16
17
18
19
20
21
22
23
24
25
26
27
28
29
30
31
32
33
34
35
36
37
38
39
40
41
42
43
44
45
46
47
48
49
package com.tensquare.crawler.pipeline;

import com.tensquare.crawler.dao.UserDao;
import com.tensquare.crawler.pojo.User;
import lombok.extern.slf4j.Slf4j;
import org.springframework.beans.factory.annotation.Autowired;
import org.springframework.stereotype.Component;
import us.codecraft.webmagic.ResultItems;
import us.codecraft.webmagic.Task;
import us.codecraft.webmagic.pipeline.Pipeline;
import util.DownloadUtil;
import util.IdWorker;

import java.io.IOException;

@Slf4j
@Component
public class UserPipeline implements Pipeline {


@Autowired
private UserDao userDao;

@Autowired
private IdWorker idWorker;

@Override
public void process(ResultItems resultItems, Task task) {
// 取出nickname和image
String nickname = resultItems.get("nickname").toString();
String image = resultItems.get("image").toString();

User user = new User();
user.setId(idWorker.nextId().toString());
user.setNickname(nickname);
String fileName = image.substring(image.lastIndexOf("/") + 1, image.lastIndexOf(" ") - 1);
user.setAvatar(fileName);
userDao.save(user);

// 下载图片
try {
String url = image.substring(image.indexOf("https://"), image.lastIndexOf(" ") - 1);
DownloadUtil.download(url, fileName, "E:/userImage");
} catch (IOException e) {
log.error("下载文件发生异常!e = ", e);
}

}
}

任务类(Task)

1
2
3
4
5
6
7
8
9
10
11
12
13
14
15
16
17
18
19
20
21
22
23
24
25
26
27
28
29
30
31
32
33
34
35
36
37
38
package com.tensquare.crawler.task;

import com.tensquare.crawler.pipeline.UserPipeline;
import com.tensquare.crawler.processor.UserProcessor;
import lombok.extern.slf4j.Slf4j;
import org.springframework.beans.factory.annotation.Autowired;
import org.springframework.scheduling.annotation.Scheduled;
import org.springframework.stereotype.Component;
import us.codecraft.webmagic.Spider;
import us.codecraft.webmagic.scheduler.RedisScheduler;

/**
* 用户数据爬取类
*/
@Slf4j
@Component
public class UserCrawlerTask {

@Autowired
private UserProcessor userProcessor;

@Autowired
private UserPipeline userPipeline;

@Autowired
private RedisScheduler redisScheduler;

@Scheduled(cron = "0 0 6 * * *")
public void userTask () {
log.info("开始爬取用户数据");
Spider spider = Spider.create(userProcessor);
spider.addUrl("https://blog.csdn.net/")
.addPipeline(userPipeline)
.setScheduler(redisScheduler)
.start();
}

}

注意:addUrl方法以/结尾

爬取效果

文章数据

用户数据

用户数据

用户头像

文章作者: imxushuai
文章链接: https://www.imxushuai.com/2002/01/02/11.十次方人工智能笔记一:网络爬虫/
版权声明: 本博客所有文章除特别声明外,均采用 CC BY-NC-SA 4.0 许可协议。转载请注明来自 imxushuai
支付宝打赏
微信打赏